
Supplies
Scrap kit of choice - I am using "Spookylicious" by Laura's Designs available from Twilight Scraps
Tube of choice - I am using the Halloween Cookie poser artwork of Lisa of Sophisticated Scraps which is PTU available from her store
NGBlackBlue Gradient here
Fonts of choice - I am using Valken and CaseConected
Plugins: Mura Meister > Copies
Greg's Factory Output II > Pool Shadow
Let's begin...
Open a new 600 x 600 blank canvas flood-filled white
Paste BlackRose as new layer
Resize by 15%
LEAVE IN POSITION!!
Effects > Plugins > Mura Meister > Copies with the following settings:
Paste Pumpkin as new layer
Resize by 20%
LEAVE IN POSITION!!
Repeat Mura Meister > Copies with the same settings
Resize by 105%
Layers > Merge > Merge Down
Select inside your new Frame
Selections > Modify > Expand by 10
Add a new raster layer
Flood fill black
Layers > Arrange > Move Down
KEEP SELECTED!!
Add a new raster layer
Select your Materials Palette
Open Material Properties and select Gradients tab
Find your NGBlackBlue Gradient
Invert CHECKED
OK
Flood fill layer
Deselect
Lower opacity to 50
Layers > Merge > Merge Down
Paste Moon and Bats as new layer
Resize by 60%
Position in upper corner to liking
Duplicate
Activate bottom copy
Adjust > Blur > Gaussian Blur with a radius of 20.00
Select the area outside the paper background layer
Selections > Invert
Activate both Moon layers and press delete
KEEP SELECTED!!
Paste Witch Silouhette as new layer
Image > Rotate by 5 to the left
Resize by 25%
Position to the left
Duplicate three times and position them across the width from the left to right
Delete the overhanging excess from the first and last witches
Name them Witch1, Witch2, witch3 and Witch4
Hide them for now - we'll come back to them for the animation
Activate top layer
Paste your Tube as new layer
Resize as necessary and position to liking
Paste Spider Web as new layer
Layers > Arrange > Send to Bottom
Resize by 90%
Adjust > Blur > Radial Blur with the following settings:
Duplicate, then Layers > Merge > Merge Down
Resize layer by 95%
Crop and resize tag
Image > Canvas Resize 520 x 520
Effects > Texture Effects > Antique - Mosaic with the following settings:
Select your Preset Shape Tool and set to Ellipse
Foreground - #000000
Background - null
Width - 2.00
Hold your shift key down and draw out a circle around your tag
Use the nodes to resize circle to liking
Select your Text Tool and font of choice
I am using Valken
Foreground - #000000
Background - #eb6602 (to match tag)
Stroke width 2.00
Type out text of choice on curve and position to liking
Open Layer Palette and Vector Layer
Close off Ellipse and convert to raster layer
Effects > Plugins > Greg's Factory Output II > Pool Shadow with default settings
Repeat Pool Shadow effect again, adjusting the top six slides to 100
Activate top layer
Select another font of choice
I am using CaseConected
Same text colours
Type out your name
Objects > Align > Horizontal Centre in Canvas
Convert to raster layer
Repeat above Pool Shadow ONCE
Apply drop shadow of choice
Finally, add your © copyright, licence and watermark, then save as a GIF or JPG and you're done!
** IF YOU WISH TO ANIMATE PLEASE FOLLOW THESE NEXT STEPS **
Remember those Witches we duplicated earlier?
OK activate Witch1 and keep the remaining three hidden
Edit > Copy Merged
Open Animation Shop
Edit > Paste as New Animation
Back to PSP
Hide Witch1 and activate Witch2
Edit > Copy Merged
In Animation Shop
Edit > Paste After Current Frame
Back to PSP
Hide Witch2 and activate Witch3
Edit > Copy Merged
In Animation Shop
Edit > Paste After Current Frame
Back to PSP
Hide Witch3 and activate Witch4
Edit > Copy Merged
In Animation Shop
Edit > Paste After Current Frame
Back to PSP
Hide Witch4 so none of them are visible
Edit > Copy Merged
In Animation Shop
Edit > Paste After Current Frame
You should have a total of 5 Frames
Select All, then change Frame Properties to 40
Activate the last Frame (the one with NO witches in) and change Frame Properties to 100
Now save as a GIF and you're done!
Thanks for trying my tutorial!
::st!na::
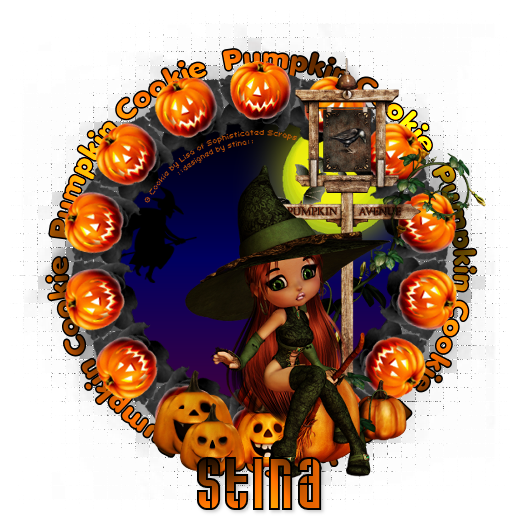
Here is a non-animated version:
© Tutorial written by Stina on 14th September 2009
All rights reserved
Fonts of choice - I am using Valken and CaseConected
Plugins: Mura Meister > Copies
Greg's Factory Output II > Pool Shadow
Let's begin...
Open a new 600 x 600 blank canvas flood-filled white
Paste BlackRose as new layer
Resize by 15%
LEAVE IN POSITION!!
Effects > Plugins > Mura Meister > Copies with the following settings:
Paste Pumpkin as new layer
Resize by 20%
LEAVE IN POSITION!!
Repeat Mura Meister > Copies with the same settings
Resize by 105%
Layers > Merge > Merge Down
Select inside your new Frame
Selections > Modify > Expand by 10
Add a new raster layer
Flood fill black
Layers > Arrange > Move Down
KEEP SELECTED!!
Add a new raster layer
Select your Materials Palette
Open Material Properties and select Gradients tab
Find your NGBlackBlue Gradient
Invert CHECKED
OK
Flood fill layer
Deselect
Lower opacity to 50
Layers > Merge > Merge Down
Paste Moon and Bats as new layer
Resize by 60%
Position in upper corner to liking
Duplicate
Activate bottom copy
Adjust > Blur > Gaussian Blur with a radius of 20.00
Select the area outside the paper background layer
Selections > Invert
Activate both Moon layers and press delete
KEEP SELECTED!!
Paste Witch Silouhette as new layer
Image > Rotate by 5 to the left
Resize by 25%
Position to the left
Duplicate three times and position them across the width from the left to right
Delete the overhanging excess from the first and last witches
Name them Witch1, Witch2, witch3 and Witch4
Hide them for now - we'll come back to them for the animation
Activate top layer
Paste your Tube as new layer
Resize as necessary and position to liking
Paste Spider Web as new layer
Layers > Arrange > Send to Bottom
Resize by 90%
Adjust > Blur > Radial Blur with the following settings:
Duplicate, then Layers > Merge > Merge Down
Resize layer by 95%
Crop and resize tag
Image > Canvas Resize 520 x 520
Effects > Texture Effects > Antique - Mosaic with the following settings:
Select your Preset Shape Tool and set to Ellipse
Foreground - #000000
Background - null
Width - 2.00
Hold your shift key down and draw out a circle around your tag
Use the nodes to resize circle to liking
Select your Text Tool and font of choice
I am using Valken
Foreground - #000000
Background - #eb6602 (to match tag)
Stroke width 2.00
Type out text of choice on curve and position to liking
Open Layer Palette and Vector Layer
Close off Ellipse and convert to raster layer
Effects > Plugins > Greg's Factory Output II > Pool Shadow with default settings
Repeat Pool Shadow effect again, adjusting the top six slides to 100
Activate top layer
Select another font of choice
I am using CaseConected
Same text colours
Type out your name
Objects > Align > Horizontal Centre in Canvas
Convert to raster layer
Repeat above Pool Shadow ONCE
Apply drop shadow of choice
Finally, add your © copyright, licence and watermark, then save as a GIF or JPG and you're done!
** IF YOU WISH TO ANIMATE PLEASE FOLLOW THESE NEXT STEPS **
Remember those Witches we duplicated earlier?
OK activate Witch1 and keep the remaining three hidden
Edit > Copy Merged
Open Animation Shop
Edit > Paste as New Animation
Back to PSP
Hide Witch1 and activate Witch2
Edit > Copy Merged
In Animation Shop
Edit > Paste After Current Frame
Back to PSP
Hide Witch2 and activate Witch3
Edit > Copy Merged
In Animation Shop
Edit > Paste After Current Frame
Back to PSP
Hide Witch3 and activate Witch4
Edit > Copy Merged
In Animation Shop
Edit > Paste After Current Frame
Back to PSP
Hide Witch4 so none of them are visible
Edit > Copy Merged
In Animation Shop
Edit > Paste After Current Frame
You should have a total of 5 Frames
Select All, then change Frame Properties to 40
Activate the last Frame (the one with NO witches in) and change Frame Properties to 100
Now save as a GIF and you're done!
Thanks for trying my tutorial!
::st!na::
Here is a non-animated version:
© Tutorial written by Stina on 14th September 2009
All rights reserved
No comments:
Post a Comment