

Supplies
Scrap kit of choice - I am using "Spookylicious" by Wicked Princess Scraps available from Twilight Scraps
Tube of choice - I am using a delsightful Cookie Poser made by Lisa of Sophisticated Scraps which is available from her store
Template 96 by Kristin available from her blog
DBV_Mask_02 by Vayb available here
Fonts of choice - I am using Lucida Blackletter
Plugins: Eye Candy 4000 > Gradient Glow
Let's begin...
Open Template 96 by Kristin
Shift D to duplicate and close off original
Delete Credit and WordArt2 layers
Image > Canvas Resize 650 x 500 centred
Select Rectangle layer with Magic Wand
Selections > Modify > Feather by 2
Paste Paper of choice as new layer
Resize by 65%
Selections > Invert
Delete then deselect
Paste MoonBats as new layer
LEAVE IN POSITION!!
Duplicate and set blend mode to Multiply
Layers > Merge > Merge Down
Paste Spider Web as new layer
Resize by 45%
Position to the far left of template
Erase excess beneath WordArt
Duplicate, then Image > Mirror
Position to the lower far right
Erase any excess
Layers > Merge > Merge Down
Lower opacity to 20
Select each star on the Stars layer
Selections > Modify > Feather by 12
Paste PP17 INTO selection
KEEP SELECTED!!
Adjust > Blur > Gaussian Blur with a radius of 5.00
Duplicate, then Layers > Merge > Merge Down
Deselect
Paste Bat3 as new layer
Image > Rotate by 5 to the left
Resize by 26%
Position over bat on the Moon we pasted in the beginning
Erase any excess of lower bat as needed
Duplicate and set blend mode to Multiply
Then lower opacity to 55
Layers > Merge > Merge Down
Duplicate again, then Image > Mirror
Resize by 95% and position to the left over WordArt
Paste Cat as new layer
Resize by 60%
Position to liking
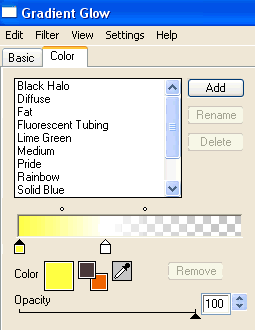
Effects > Plugins > Eye Candy 4000 > Gradient Glow with the following settings:
Paste Spider as new layer
Resize by 20%
Position from Web to liking
Paste Tube of choice as new layer
Resize as necessary and position
Paste Paper as new layer
Layers > Arrange > Send to Bottom
Layers > New Mask Layer > From Image
Apply DBV_Mask_02
OK
Layers > Merge > Merge Group
Position slightly upwards
Activate Brush layer
Resize by 90%
Lower opacity to 40 and set blend mode to Multiply
Crop and resize to liking
Select Text Tool and font of choice
I am using LucidaBlackletter
Text colour black
Objects > Align > Horizontal Centre in Canvas
Convert to raster layer
Apply Gradient Glow and drop shadow of choice
Finally, add your © copyright, licence and watermark, then save as a GIF or JPG and you're done!
** IF YOU WISH TO ANIMATE PLEASE FOLLOW THESE NEXT STEPS **
Activate the Magic WordArt layer
Duplicate twice and rename Magic1, Magic2 and Magic3
On Magic1, go to Adjust > Add/Remove Noise > Add Noise set to 20
Gaussian and Monochrome CHECKED
Activate Magic2 and repeat, adjusting Noise to 25
Activate Magic3 and repeat once again, adjusting Noise to 30
Now to animate!
Lower opacity of Stars layer to 50
Activate Magic1
Edit > Copy Merged
Open Animation Shop
Edit > Paste as New Animation
Leave opacity of Stars as is and activate Magic2
Edit > Copy Merged
Open Animation Shop
Edit > Paste as New Animation
Change opacity of Stars to 75
Activate Magic3
Edit > Copy Merged
Open Animation Shop
Edit > Paste as New Animation
Leave opacity at 75 as is and activate Magic1
Edit > Copy Merged
Open Animation Shop
Edit > Paste as New Animation
Return opacity of Stars layer to 100
Activate Magic2
Edit > Copy Merged
Open Animation Shop
Edit > Paste as New Animation
Now activate Magic3
Edit > Copy Merged
Open Animation Shop
Edit > Paste as New Animation
Now save as a GIF and you're done!
Thanks for trying my tutorial!
::st!na::
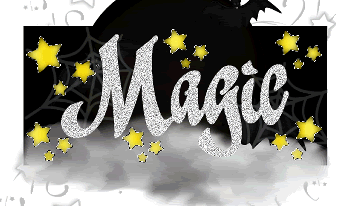
Here is a non-animated version:
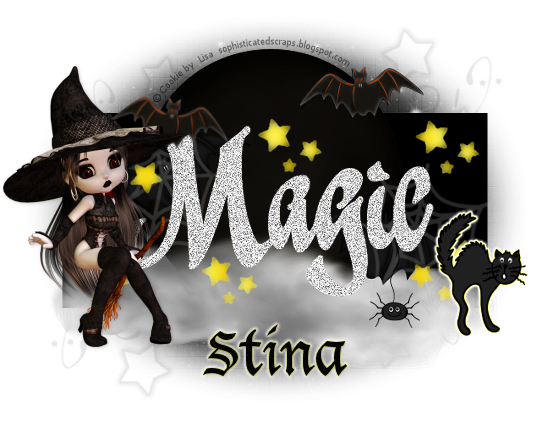
© Tutorial written by Stina on 16th September 2009
All rights reserved
No comments:
Post a Comment