
Supplies
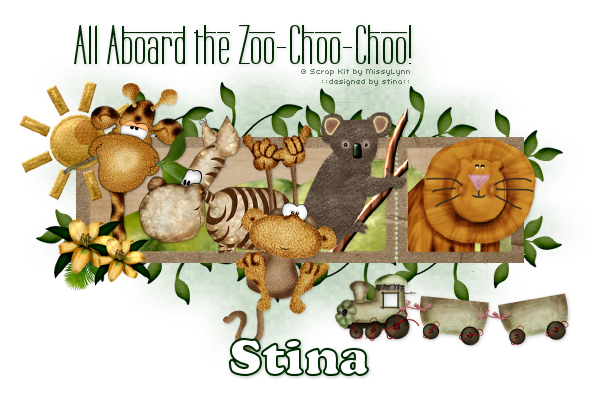
Scrap kit of choice - I am using "Zoo Pals" by MissyLynn Scraps available from Stargazer Scraps, Scraps with Attitude, Totally Sweet Designs, Paradise 4 Scrappers and Katelynns Designs
Tubes of choice - I used those supplied in the kit
WSL_Mask7 by Chelle available from her blog
Fonts of choice - I am using Labtop Overscore and Cooper Blk BT
Plugin: Xero > Fritillary
Animation Shop
Let's begin....
Open a new 750 x 600 blank canvas flood-filled white
Paste Frame7 as new layer
Resize by 80%
Resize by 80%
Select inside the Frame with Magic Wand
Selections > Modify > Expand by 8
Add new raster layer
Paste Paper of choice INTO Selection
Layers > Arrange > Move Down
Deselect
Selections > Modify > Expand by 8
Add new raster layer
Paste Paper of choice INTO Selection
Layers > Arrange > Move Down
Deselect
Paste Grass as new layer
Resize by 80%
Position inside Frame
Erase the excess between left and right Frame
Resize by 80%
Position inside Frame
Erase the excess between left and right Frame
Paste Sun as new layer
resize by 35%
Position in upper left
resize by 35%
Position in upper left
Paste Giraffe as new layer
Resize by 40%
Resize by 40%
Paste Zebra as new layer
Resize by 40%
Resize by 40%
Paste Koala as new layer
Resize by 25%
Position to the right Frame
Resize by 25%
Position to the right Frame
Paste Monkey as new layer
Resize by 40%
Resize by 40%
Paste Lion as new layer
Resize by 35%
Resize by 35%
Select inside your Frames again
Selections > Invert
Selections > Modify > Contract by 2
Selections > Modify > Feather by 2
Erase any excess you wish to remove overhanging the bottom of your Frame
Selections > Invert
Selections > Modify > Contract by 2
Selections > Modify > Feather by 2
Erase any excess you wish to remove overhanging the bottom of your Frame
Activate Frame layer again
Paste ChooChoo as new layer
Resize by 40%
Position to the lower right
Hide layer for now
Resize by 40%
Position to the lower right
Hide layer for now
Paste Leaf2 as new layer
Resize by 60%
Image > Flip
Position along top of Frame
Layers > Arrange > Send to Bottom
Resize by 60%
Image > Flip
Position along top of Frame
Layers > Arrange > Send to Bottom
Duplicate and position along top
Duplicate again
Image > Flip, then Image > Mirror
Position to the right and erase any excess at the end
Duplicate again
Image > Flip, then Image > Mirror
Position to the right and erase any excess at the end
Hide all layers except the Leafs
Layers > Merge > Merge Visible
Unhide layers again
Layers > Merge > Merge Visible
Unhide layers again
Add any other elements of your choice to your liking
Paste Paper of choice as new layer
Layers > Arrange > Send to Bottom
Layers > Arrange > Send to Bottom
Layers > New Mask Layer > From Image
Apply WSL_Mask7
OK
Layers > Merge > Merge Group
Lower opacity to 50
Apply WSL_Mask7
OK
Layers > Merge > Merge Group
Lower opacity to 50
Effects > Plugins > Xero > Fritillary with the following settings:
Crop and resize to liking
Select your Text Tool and font of choice
I am using Labtop Overscore
Text Colour to match tag - I am using #012901
I am using Labtop Overscore
Text Colour to match tag - I am using #012901
Type out Text of choice and position
Apply a drop shadow of choice
Apply a drop shadow of choice
Select another font of choice
I am using Cooper Blk BT
Foreground - #012901
Background - #FFFFFF
Stroke width - 2.00
I am using Cooper Blk BT
Foreground - #012901
Background - #FFFFFF
Stroke width - 2.00
Type out your name
Objects > Align > Horizontal Centre in Canvas
Convert to raster layer
Duplicate and set blend mode to Multiply
Apply drop shadow of choice
Objects > Align > Horizontal Centre in Canvas
Convert to raster layer
Duplicate and set blend mode to Multiply
Apply drop shadow of choice
Finally, add your © copyright, licence and watermark, then save as a GIF or JPG and you're done!
** IF YOU WISH TO ANIMATE PLEASE FOLLOW THESE NEXT STEPS **
Activate your ChooChoo layer
Duplicate three times and rename Train1, Train2, Train3 and Train4
Duplicate three times and rename Train1, Train2, Train3 and Train4
Leave Train1 in position
Carefully move Train2, Train3 and Train 4 across the bottom of your Frame in EXACT line of Train1
Carefully move Train2, Train3 and Train 4 across the bottom of your Frame in EXACT line of Train1
Then activate Train1 and hide other layers
Edit > Copy Merged
Edit > Copy Merged
Open Animation Shop
Edit > Paste as New Animation
Edit > Paste as New Animation
Back to PSP
Hide Train1 and activate Train2
Edit > Copy Merged
Hide Train1 and activate Train2
Edit > Copy Merged
In Animation Shop
Edit > Paste after Current Frame
Edit > Paste after Current Frame
Back to PSP
Hide Train2 and activate Train3
Edit > Copy Merged
Hide Train2 and activate Train3
Edit > Copy Merged
In Animation Shop
Edit > Paste after Current Frame
Edit > Paste after Current Frame
Back to PSP
Hide Train3 and activate Train4
Edit > Copy Merged
Hide Train3 and activate Train4
Edit > Copy Merged
In Animation Shop
Edit > Paste after Current Frame
Edit > Paste after Current Frame
Back to PSP
Set Cat4 back to Soft Light and opacity to 100
Edit > Copy Merged
Set Cat4 back to Soft Light and opacity to 100
Edit > Copy Merged
In Animation Shop
Edit > Paste after Current Frame
Edit > Paste after Current Frame
Select All, and change Frame Properties to 50
Now save as a GIF and you're done!
Now save as a GIF and you're done!
Thanks for trying my tutorial!
::st!na::
Here is a non-animated version:
© Tutorial written by Stina on 25th August 2009
All rights reserved
No comments:
Post a Comment