
Supplies
Scrap kit of choice - I am using the part of the "Starving Artist Collab" by Bits n' Bobs available for the low price of $2 for the month of July from Exquisite Scraps
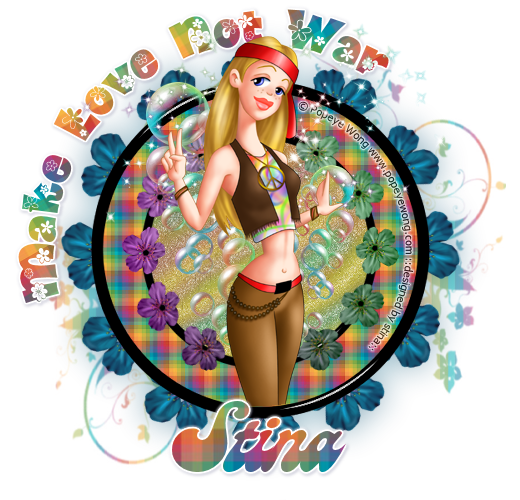
Tube of choice - I am using the artwork of Popeye Wong which is FTU with proper credit and link
tde_maske20 here
Fonts of choice - I am using Daffodil and Candy
Plugins: Alien Skin Eye Candy 5: Impact Glass
Mura Meister Copies
Colour Rave Atmospheriser
Eye Candy 4000 Gradient Glow
Let's begin...
Open a new 700 x 600 blank canvas flood-filled white
Select your Preset Shape Tool and set to Ellipse
Foreground - #000000
Background - Null
Stroke width - 15.00
Foreground - #000000
Background - Null
Stroke width - 15.00
Hold your shift key and draw out a circle in the centre of your canvas
Objects > Align > Centre in Canvas
Convert to raster layer
Objects > Align > Centre in Canvas
Convert to raster layer
Effects > Plugins > Eye Candy 5: Impact > Glass with the following settings:
Select the inside of Frame with Magic Wand
Selections > Modify > Expand by 10
Add a new raster layer
Paste Paper of choice INTO selection
Deselect
Layers > Arrange > Move Down
Selections > Modify > Expand by 10
Add a new raster layer
Paste Paper of choice INTO selection
Deselect
Layers > Arrange > Move Down
Duplicate Frame and reszie by 70%
Select inside with your Magic Wand
Selections > Modify > Expand by 5
Add a new raster layer
Paste another paper of choice INTO selection
Deselect
Layers > Arrange > Move Down
Select inside with your Magic Wand
Selections > Modify > Expand by 5
Add a new raster layer
Paste another paper of choice INTO selection
Deselect
Layers > Arrange > Move Down
Activate top layer
Paste a Flower as new layer
Resize by 25%
Resize by 25%
LEAVE IN POSITION!!
Effects > Plugins > Mura Meister > Copies with the following settings:
Then Effects > Plugins > Colour Rave > Atmospherizer with the following settings:
Paste another Flower as new layer
Resize by 45%
Resize by 45%
LEAVE IN POSITION!!
Effects > Plugins > Mura Meister > Copies with the following settings:
Layers > Arrange > Send to Bottom
Duplicate
Duplicate
On bottom layer;
Adjust > Blur > Gaussian Blur with a radius of 15.00
Lower opacity to around 50
Adjust > Blur > Gaussian Blur with a radius of 15.00
Lower opacity to around 50
Activate top layer again
Paste some Bubbles as new layer
Resize by 45%
Position to the left
Resize by 45%
Position to the left
Paste some sparkles as new layer
Position to the top
Position to the top
Paste a paper of choice as new layer
Layers > Arrange > Send to Bottom
Layers > Arrange > Send to Bottom
Layers > New Mask Layer > From Image
Apply tde_maske20
Invert mask data/transparency checked
OK
Layers > Merge > Merge Group
Apply tde_maske20
Invert mask data/transparency checked
OK
Layers > Merge > Merge Group
Layers > Arrange > Send to Bottom
Resize by 90% and position
Lower opacity to 50
Resize by 90% and position
Lower opacity to 50
Activate top layer again and paste your Tube of choice as new layer
Resize as necessary
Position to your liking
Resize as necessary
Position to your liking
If your Tube is like mine (ie. long), then select the inside of the larger Frame
Selections > Modify > Contract by 2
Selections > Modify > Feather by 2
Selections > Invert
Selections > Modify > Contract by 2
Selections > Modify > Feather by 2
Selections > Invert
Use your Eraser to remove the excess from the bottom
Apply any drop shadows of choice to your tube and elements
Select your Preset Shape Tool and set to Ellipse again
Foreground - #000000
Background - Null
Stroke width - 2.00
Foreground - #000000
Background - Null
Stroke width - 2.00
Hold your shift key and draw out a circle around your canvas
Objects > Align > Centre in Canvas
Objects > Align > Centre in Canvas
Select your Text Tool and font of choice
I am using Daffodil
Text colour of choice - I am using one of the papers
I am using Daffodil
Text colour of choice - I am using one of the papers
On your curve type out your text of choice
Position to your liking
Position to your liking
Open the Layer Palette and Vector Layer
Hide the Ellipse and convert to raster layer
Apply a Gradient Glow and drop shadow of choice
Hide the Ellipse and convert to raster layer
Apply a Gradient Glow and drop shadow of choice
Select another font of choice
I am using Candy
Same Paper for text colour
I am using Candy
Same Paper for text colour
Type out your name
Objects > Align > Horizontal Centre in Canvas
Convert to raster layer
Apply a Gradient Glow and drop shadow of choice
Objects > Align > Horizontal Centre in Canvas
Convert to raster layer
Apply a Gradient Glow and drop shadow of choice
Finally, add your © copyright, licence and watermark, then save as a GIF or JPG and you're done!
** IF YOU WISH TO ANIMATE PLEASE FOLLOW THESE NEXT STEPS **
Activate your Mask layer
Duplicate twice and rename them Sparkles1, Sparkles2 and Sparkles3
Hiding the Sparkles2 and Sparkles3 go to:
Effects > Plugins > Xenofex 2 > Constellation with the following settings:
Effects > Plugins > Xenofex 2 > Constellation with the following settings:
Repeat with the remaining two Sparkles layers adjusting the Random Seed
Now let's animate!!!
Activate Sparkles1 and hide Sparkles2
Edit > Copy Merged
Edit > Copy Merged
Open Animation Shop
Edit > Paste as New Animation
Edit > Paste as New Animation
Back to PSP
Hide Sparkles1 and activate Sparklesr2
Edit > Copy Merged
Hide Sparkles1 and activate Sparklesr2
Edit > Copy Merged
In Animation Shop
Edit > Paste AFTER Current Frame
Edit > Paste AFTER Current Frame
Back to PSP
Hide Sparkles2 and activate Sparkles3
Edit > Copy Merged
Hide Sparkles2 and activate Sparkles3
Edit > Copy Merged
In Animation Shop
Edit > Paste AFTER Current Frame
Edit > Paste AFTER Current Frame
Save as a GIF and you're done!
Thanks for trying my tutorial!
::st!na::
Here is a non-animated version:
© Tutorial written by Stina on 5th July 2009
All rights reserved
No comments:
Post a Comment