
Supplies
Scrap kit of choice - I am using "Angelic Passions" by MissyLynn Scraps available from Stargazer Scraps, KatelynnsDesigns, Totally Sweet Designs, Paradise 4 Scrappers and Scraps with Attitude
Images of choice - I am using the lovely artwork of Marijke Peeters from whom I gained permission
WSL_Mask10 by Chelle available from her blog
Fonts of choice - I am using LiorahBT
No Plugins
Let's begin...
.
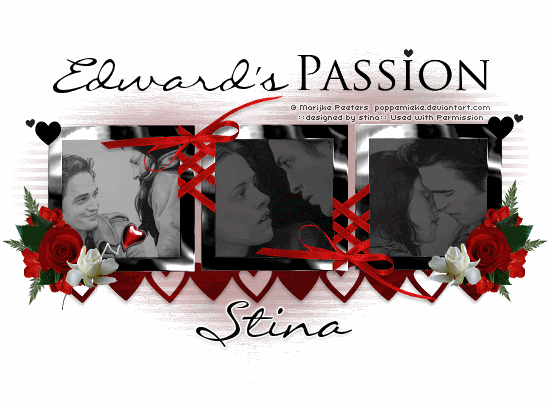
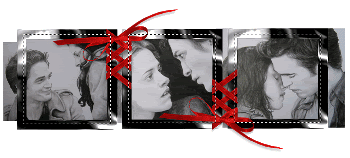
Open a new 750 x 500 blank canvas flood-filled white
Paste Frame5 as new layer
LEAVE IN POSITION
Draw a rectangle around each Frame
Add a new raster layer
Layers > Arrange > Move Down
Flood fill each Frame Black
Add a new raster layer
Layers > Arrange > Move Down
Flood fill each Frame Black
KEEP SELECTED!!
Paste three images of choice as new layers
Resize each as necessary to fit
Position within each Frame
Resize each as necessary to fit
Position within each Frame
Selections > Modify > Invert
Press delete on each layer
Deselect
Press delete on each layer
Deselect
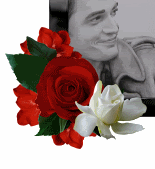
Paste Flower2 as new layer
Resize by 15%
Position in lower right
Duplicate then set blend mode to Multiply
Lower opacity to 70
Layers > Merge > Merge Down
Resize by 15%
Position in lower right
Duplicate then set blend mode to Multiply
Lower opacity to 70
Layers > Merge > Merge Down
Duplicate, then Image > Mirror
Paste Flower4 as new layer
Image > Mirror
Resize by 18%
Position alongside Flower2 in lower right
Image > Mirror
Resize by 18%
Position alongside Flower2 in lower right
Duplicate, then Image > Mirror
Paste Flower1 as new layer
Image > Mirror
Resize by 12%
Position behind Flowers to the lower left
Duplicate and position a couple of times
Layers > Merge > Merge Down twice
Image > Mirror
Resize by 12%
Position behind Flowers to the lower left
Duplicate and position a couple of times
Layers > Merge > Merge Down twice
Duplicate, then Image > Mirror
Paste Leaf as new layer
Image > Rotate by 20 to the left
Resize by 12%
Position behind Flowers
Image > Rotate by 20 to the left
Resize by 12%
Position behind Flowers
Duplicate several times
Mirror and Flip and position each to your liking
Paste Pin as new layer
Resize by 25%
Position to your liking
Resize by 25%
Position to your liking
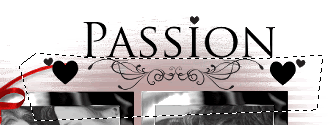
Paste Passion WordArt as new layer
Resize by 65%
Position along top of Frame to the right
Resize by 65%
Position along top of Frame to the right
With your Freehand Tool make a selection around the bottom of the WordArt to the far right
Delete the deselect
Delete the deselect
Paste Paper of choice as new layer
Layers > Arrange > Send to Bottom
Layers > New Mask Layer > From Image
Apply WSL_Mask10
OK
Layers > Merge > Merge Group
Apply WSL_Mask10
OK
Layers > Merge > Merge Group
Lower opacity to 50
Paste HeartLine as new layer
Position along bottom of Frame
Position along bottom of Frame
Crop and resize
Select your Text Tool and font of
choice
I am using LiorahBT
Text colour of choice - I am using Black
I am using LiorahBT
Text colour of choice - I am using Black
Type out "Edward's" and position next to the word "PASSION"
Convert to raster layer
Convert to raster layer
Select another font of choice
I am using the same font
I am using the same font
Type out your name
Objects > Align > Horizontal Centre in Canvas
Convert to raster layer
Apply a Gradient Glow and drop shadow of choice
Objects > Align > Horizontal Centre in Canvas
Convert to raster layer
Apply a Gradient Glow and drop shadow of choice
Finally, add your © copyright, licence and watermark, then save as a GIF or JPG and you're done!
** IF YOU WISH TO ANIMATE PLEASE FOLLOW THESE NEXT STEPS **
Activate your Image layers
Rename Image1, Image2 and Image3
Rename Image1, Image2 and Image3
Activate Image1 at 100% opacity
Lower the opacity of Image2 and Image3 to 45%
Edit > Copy Merged
Lower the opacity of Image2 and Image3 to 45%
Edit > Copy Merged
Open Animation Shop
Edit > Paste as New Animation
Edit > Paste as New Animation
Back to PSP
Lower opacity of Image1 to 45% and raise Image2 to 100%
Edit > Copy Merged
Lower opacity of Image1 to 45% and raise Image2 to 100%
Edit > Copy Merged
In Animation Shop
Edit > Paste after Current Frame
Edit > Paste after Current Frame
Back to PSP
Lower opacity of Image2 back to 45% and raise Image3 to 100%
Edit > Copy Merged
Lower opacity of Image2 back to 45% and raise Image3 to 100%
Edit > Copy Merged
In Animation Shop
Edit > Paste after Current Frame
Edit > Paste after Current Frame
Select all and set Frame Properties to 70
Now save as a GIF and you're done!
Now save as a GIF and you're done!
Thanks for trying my tutorial!
::st!na::
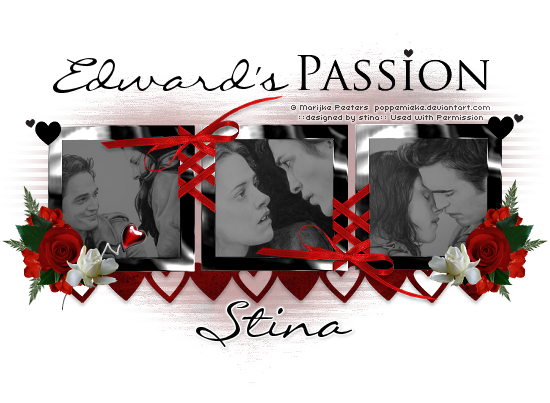
Here is a non-animated version:
© Tutorial written by Stina on 9th July 2009
All rights reserved
All rights reserved
No comments:
Post a Comment