
Supplies
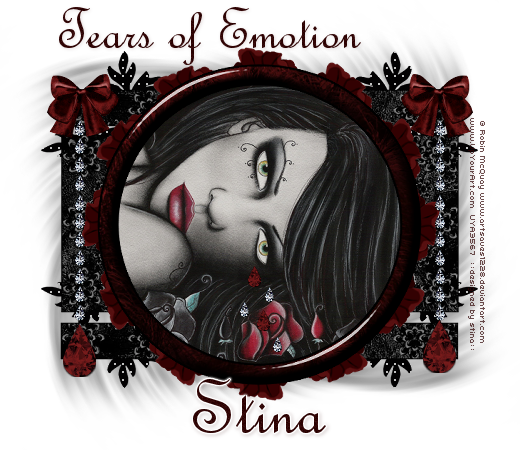
Scrap kit of choice - I am using the lovely "Time of Emotions" by Shellez Creations available from Scraps with Attitude and KatelynnsDesigns
Tube or Image of choice - I am using the lovely artwork of Robin McQuay which can be purchased with a licence through UpYourArt
**PLEASE DO NOT USE HIS ARTWORK WITHOUT THE APPROPRIATE LICENCE**
sg_OldFashionedLace Mask here
Font of choice - I am using French Script
Plugins: Alien Skin Eye Candy 5: Impact Glass
Mura Meister Copies
Simple Top Left Mirror
Eye Candy 4000 Gradient Glow (for text, optional)
Let's begin....
Open a new 700 x 550 canvas flood-filled white
Open a paper of choice and minimise
Select your Preset Shape Tool and set to Rectangle
Open your Material Properties and select Patterns tab
Select your Paper of choice as pattern
Open your Material Properties and select Patterns tab
Select your Paper of choice as pattern
In your Materials Palette set your Foreground/Background to the following:
Foreground - #000000
Background - Paper of choice
Background - Paper of choice
Stroke Width - 2.00
Draw out a Rectangle in the centre of your canvas
Objects > Align > Centre in Canvas
Convert to raster layer
Convert to raster layer
Draw out a long thin rectangle above larger one
Objects > Align > Horizontal Centre in Canvas
Convert to raster layer
Duplicate, then Image > Flip
Objects > Align > Horizontal Centre in Canvas
Convert to raster layer
Duplicate, then Image > Flip
Hide Background layer and Merge Visible
Change your Preset Shape Tool to Ellipse
Set your Stroke width to 30.00
Foreground - #000000
Background - null
Set your Stroke width to 30.00
Foreground - #000000
Background - null
Hold your Shift key and draw out a circle
Objects > Align > Centre in Canvas
Convert to raster layer
Select the rim of the Frame with your Magic Wand
Selections > Modify > Contract by 5
Paste a paper of choice INTO selection
Selections > Modify > Contract by 5
Paste a paper of choice INTO selection
KEEP SELECTED!!
Effects > 3D Effects > Inner Bevel with the following settings:

STILL SELECTED!!
Selections > Modify > Expand by 5
Effects > Plugins > Alien Skin Eye Candy 5: Impact > Glass with the following settings:
Deselect
Select the INSIDE of the Frame with your Magic Wand
Selections > Modify > Expand by 10
Add a new raster layer
Flood fill black
Layers > Arrange > Move Down
Selections > Modify > Expand by 10
Add a new raster layer
Flood fill black
Layers > Arrange > Move Down
KEEP SELECTED!!
Paste Image or Tube of choice as new layer
Resize as necessary
Position within Frame
Resize as necessary
Position within Frame
Selections > Invert
Delete then deselect
Delete then deselect
Paste Flower03 as new layer
Resize by 20%
Resize by 20%
LEAVE IN POSITION!!
Effects > Plugins > Mura Meister > Copies with the following settings:
Duplicate, then set blend mode to Soft Light
Layers > Merge > Merge Down
Layers > Arrange > Move Down
Repeat
Repeat
Activate top layer
Paste Bow01 as new layer
Resize by 20%
Position in upper right
Resize by 20%
Position in upper right
Duplicate, then Image > Mirror
Paste Gem03 as new layer
Resize by 15%
Duplicate, and position directly below the first
Repeat until you have a Teardrop chain
Resize by 15%
Duplicate, and position directly below the first
Repeat until you have a Teardrop chain

Merge each Teardrop gem together, then
Duplicate and Image > Mirror
Duplicate and Image > Mirror
Paste Gem01 as new layer
Resize by 50%
Position in the lower left
Resize by 50%
Position in the lower left
Duplicate, then Image > Mirror
Paste Gem01 as new layer again
Resize by 20%
Duplicate several times and position them as tears falling from the face in your tube or image
Resize by 20%
Duplicate several times and position them as tears falling from the face in your tube or image
Paste Gem03 as new layer again also
Resize by 15%
Duplicate a few times and position as smaller tears
Resize by 15%
Duplicate a few times and position as smaller tears
Paste Leaves02 as new layer
Resize by 35%
Image > Mirror, then Image > Flip
Position in upper left
Resize by 35%
Image > Mirror, then Image > Flip
Position in upper left
Effects > Plugins > Simple > Top Left Mirror
Layers > Arrange > Send to Bottom
Effects > Texture Effects > Weave with the following settings:
Paste Paper of choice as new layer
Layers > Arrange > Send to Bottom
Layers > Arrange > Send to Bottom
Layers > New Mask Layer > From Image
Apply sg_OldFashionedLace
OK
Layers > Merge > Merge Group
Resize by 85%
Apply sg_OldFashionedLace
OK
Layers > Merge > Merge Group
Resize by 85%
Adjust > Blur > Radial Blur with the following settings:
Lower opacity to 65
Crop and resize
Select your Text Tool and a font of choice
I am using FrenchScript
Background - #300404 (or to match your tag)
I am using FrenchScript
Background - #300404 (or to match your tag)
Type out some text of your choice
Position it to your liking
Convert to raster layer
Position it to your liking
Convert to raster layer
Select another font of choice
I am using the same
Text colour - #300404
I am using the same
Text colour - #300404
Type out your name
Objects > Align > Horizontal Centre in Canvas
Convert to raster layer
Add some noise and maybe a slight Gradient Glow
Apply a drop shadow of choice
Objects > Align > Horizontal Centre in Canvas
Convert to raster layer
Add some noise and maybe a slight Gradient Glow
Apply a drop shadow of choice
Finally, add your © copyright, licence and watermark, then save as GIF or JPG and you're done!
** IF YOU WISH TO ANIMATE PLEASE FOLLOW THESE NEXT STEPS **
Activate your Image/Tube layer layer
Duplicate it FIVE times for a total of SIX layers
Rename Fade1, Fade2, Fade3, Fade4, Fade5 and Fade6
Duplicate it FIVE times for a total of SIX layers
Rename Fade1, Fade2, Fade3, Fade4, Fade5 and Fade6
Lower the opacity on each of the layers:
Fade1 - 100%
Fade2 - 80%
Fade3 - 60%
Fade4 - 40%
Fade5 - 20%
Fade6 - 10%
Fade1 - 100%
Fade2 - 80%
Fade3 - 60%
Fade4 - 40%
Fade5 - 20%
Fade6 - 10%
Now for the animation!
Hide Fade2 through to Fade6
Edit > Copy Merged
Edit > Copy Merged
Open Animation Shop
Edit > Paste as New Animation
Edit > Paste as New Animation
Back to PSP
Hide Fade1 and activate Fade2
Edit > Copy Merged
Hide Fade1 and activate Fade2
Edit > Copy Merged
In Animation Shop
Edit > Paste AFTER Current Frame
Edit > Paste AFTER Current Frame
Back to PSP
Hide Fade2 and activate Fade3
Edit > Copy Merged
Hide Fade2 and activate Fade3
Edit > Copy Merged
In Animation Shop
Edit > Paste AFTER Current Frame
Edit > Paste AFTER Current Frame
Repeat through to Fade6, then
Hide ALL Fade1 through to Fade6 layers with only the black background visible
Edit > Copy Merged
Hide ALL Fade1 through to Fade6 layers with only the black background visible
Edit > Copy Merged
In Animation Shop
Edit > Paste AFTER Current Frame
Edit > Paste AFTER Current Frame
You should now have a total of SEVEN frames
Select all > Frame Properties to 20, then
Activate LAST FRAME ONLY and change the Properites of this Frame to 50
Activate LAST FRAME ONLY and change the Properites of this Frame to 50
Save as a GIF and you're done!
Thanks for trying my tutorial!
::st!na::
Here's a non-animated version:
© Tutorial written by Stina on 22nd April 2009
All rights reserved
No comments:
Post a Comment