
Supplies
Scrap kit of choice - I am using the gorgeous "Introducing Alice" by Jay of Heartbeat Creationz available from Stargazer Scraps and Twilight Scraps
Tube or image of choice - I am using the lovely artwork of David Desbois who is a FTU artist but requires written permission for use of his art
WSL_Mask228 by Chelle available from her blog
Fonts of choice - I am using Twilight and JoeHand2 (Alice's handwriting)
Plugins: Xero Radiance, Eye Candy 4000 HSB Noise and Eye Candy 4000 Gradient Glow (for text)
Let's begin....
Open a 600 x 600 blank canvas flood-filled white
Open a couple of papers of choice and minimise them
Select your Preset Shape Tool and set to Rectangle
Activate your Materials Palette with the following:
Activate your Materials Palette with the following:
Foreground - #000000
Background - Pattern
Background - Pattern
Stroke width - 5.00
Click on the "Pattern" and select one of your papers of choice
Set scale to around 70%
Set scale to around 70%
Hold your Shift key and draw out a square (holding shift enables all sides to be drawn symmetrically)
Objects > Align > Centre in Canvas
Convert to raster layer
Objects > Align > Centre in Canvas
Convert to raster layer
Change your Pattern to another paper of choice
Hold shift again and draw out another square inside first one
Objects > Align > Centre in Canvas
Convert to raster layer
Hold shift again and draw out another square inside first one
Objects > Align > Centre in Canvas
Convert to raster layer
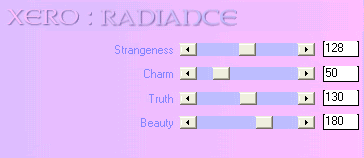
Effects > Plugins > Xero > Radiance with the following settings:
Paste Element55 (Purple Tree) as new layer
Resize by 85%
Position to the right
Resize by 85%
Position to the right
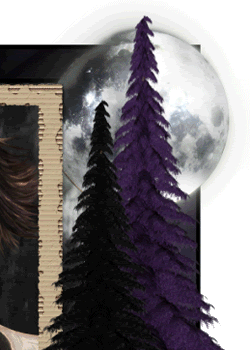
Paste Element54 (Black Tree) as new layer
Resize by 75%
Position to the right alongside purple tree
Duplicate, then move to left
Resize by 75%
Position to the right alongside purple tree
Duplicate, then move to left
Layers > Arrange > Move Down twice
Paste Element39 (Frame with bow) as new layer
Resize by 50%
Position to the left within SECOND square
Layers > Arrange > Move Down twice
Resize by 50%
Position to the left within SECOND square
Layers > Arrange > Move Down twice
Second Black Tree should now be BEHIND Frame
Paste image or tube of choice as new layer
Resize as necessary
Layers > Arrange > Move Down
Position behind Frame
Resize as necessary
Layers > Arrange > Move Down
Position behind Frame
Effects > Plugins > Xero > Radiance with same settings as above
Paste Element6 (Purple Flower shrubs) as new layer
Resize by 50%
Position to the left and move behind Tube layer
Duplicate and set blend mode to Screen
Lower opacity to 70
Layers > Merge > Merge Group
Resize by 50%
Position to the left and move behind Tube layer
Duplicate and set blend mode to Screen
Lower opacity to 70
Layers > Merge > Merge Group

Paste Element17 (Moon) as new layer
Resize by 90%
Position in upper right behind trees
Resize by 90%
Position in upper right behind trees
Activate top layer
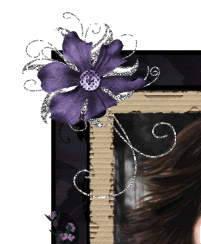
Paste Element47 (Silver Doodle Flower) as new layer
Resize by 40%
Position in upper left
Resize by 40%
Position in upper left
Adjust > Sharpness > Sharpen
Paste Element41 (Fabric Flower - Purple) as new layer
Resize by 25%
Position over centre of Silver Flower
Duplicate, then set blend mode to Screen
Lower opacity to 55
Layers > Merge > Merge Down
Resize by 25%
Position over centre of Silver Flower
Duplicate, then set blend mode to Screen
Lower opacity to 55
Layers > Merge > Merge Down
Paste Element42 (Fabric Flower - Black) as new layer
Resize by 25%
Resize by 25%
LEAVE IN POSITION!
Paste Element41 as new layer (Fabric Flower - Purple) as new layer
Resize by 20%
Resize by 20%
Layers > Merge > Merge Down
Position in lower left
Activate the Black Tree and duplicate
Position to the left
Move Tree to BEHIND Frame layer
Position to the left
Move Tree to BEHIND Frame layer
Add new raster later
Selections > Select All
Paste a paper of choice INTO selection
Deselect
Layers > Arrange > Send to Bottom
Selections > Select All
Paste a paper of choice INTO selection
Deselect
Layers > Arrange > Send to Bottom
Layers > New Mask Layer > From Image
Apply WSL_Mask228
OK
Layers > Merge > Merge Group
Lower opacity to 50
Apply WSL_Mask228
OK
Layers > Merge > Merge Group
Lower opacity to 50
Activate top layer
Select Text Tool and font of choice
I am using Twilight
Text colour to match tag
I am using Twilight
Text colour to match tag
Type out text or quote of choice
Position to your liking
Convert to raster layer
Position to your liking
Convert to raster layer
I also added "Alice Cullen" as the source of the quote in her handwriting (Joe Hand2)
Select another font of choice
I am using Joe Hand2 (Alice's handwriting)
Text colour #362041 (or one to match tag)
Objects > Align > Horizontal Centre in Canvas
Convert to raster layer
Apply a Gradient Glow and drop shadow of choice
I am using Joe Hand2 (Alice's handwriting)
Text colour #362041 (or one to match tag)
Objects > Align > Horizontal Centre in Canvas
Convert to raster layer
Apply a Gradient Glow and drop shadow of choice
Finally, add your © copyright, licence and watermark, then save as a GIF or JPG and you're done!
** IF YOU WISH TO ANIMATE PLEASE FOLLOW THESE NEXT STEPS **
Activate your Mask layer
Duplicate twice
Rename Mask1, Mask2 and Mask3
Rename Mask1, Mask2 and Mask3
Activate Mask1 and hide the other two
Effects > Plugins > Eye Candy 4000 > HSB Noise with the following settings:
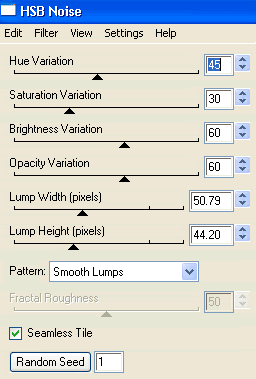
Hide Mask1 and activate Mask2
Repeat the HSB Noise adjusting only the Random Seed
Repeat the HSB Noise adjusting only the Random Seed
Hide Mask2 and activate Mask3
Repeat again adjusting the Random Seed once more
Repeat again adjusting the Random Seed once more
Now for the animation!
Hide Mask2 and Mask3 activating Mask1
Edit > Copy Merged
Edit > Copy Merged
Open Animation Shop
Edit > Paste as New Animation
Edit > Paste as New Animation
Back to PSP
Hide Mask1 and activate Mask2
Edit > Copy Merged
Hide Mask1 and activate Mask2
Edit > Copy Merged
In Animation Shop
Edit > Paste AFTER Current Frame
Edit > Paste AFTER Current Frame
Back to PSP
Hide Mask2 and activate Mask3
Edit > Copy Merged
Hide Mask2 and activate Mask3
Edit > Copy Merged
In Animation Shop
Edit > Paste AFTER Current Frame
Edit > Paste AFTER Current Frame
Select All, and adjust Frame Properties to 20
Save as a GIF and you're done!
Save as a GIF and you're done!
Thanks for trying my tutorial!
::st!na::
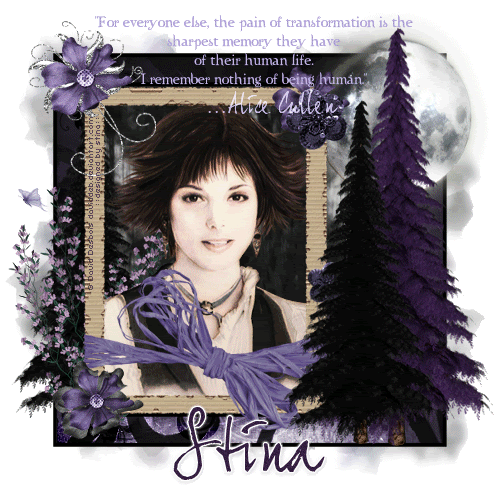
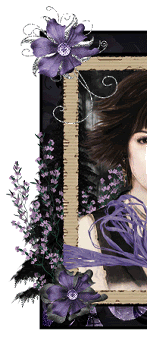
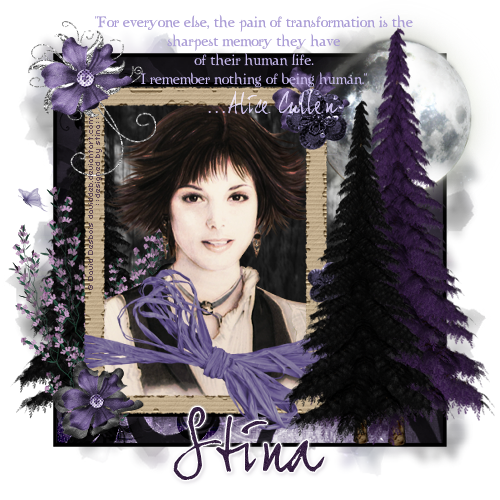
Here is a non-animated version:
© Tutorial written by Stina on 28th June 2009
All rights reserved
All rights reserved
i love what you have done with this hun! thank you so much!
ReplyDelete