
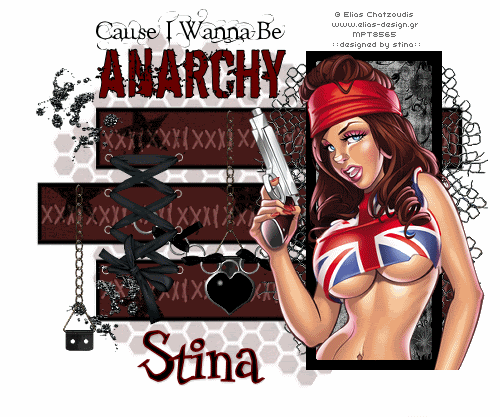
Supplies
Scrap kit of choice - I am using "Anarchy in the UK" by Creative Intentionz available at Twilight Scraps and Paradise 4 Scrappers
Tube of choice - I am using the delightful work of Elias Chatzoudis (especially for Nikki who loves Elias! *g*) available with a licence from My PSP Tubes
**PLEASE DO NOT USE HIS ARTWORK WITHOUT THE APPROPRIATE LICENCE**
Template $24 by Bel Vidotti available from her blog
WSL_Mask154 by Chelle available from her blog
Fonts of choice - I am using AL Fantasy Type, Disty Ego and Couch Lover
No Plugins
Let's begin...
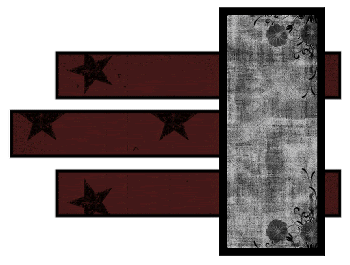
Open Template 24 by Bel Vidotti
Resize to 550 wide
Resize to 550 wide
Image > Canvas Resize to 600 x 600
Flood fill excess background white
Activate Rec3 (top rectangle)
Layers > Merge > Merge Down
Repeat
Layers > Merge > Merge Down
Repeat
Rectangles should now be ONE layer
Rename Rectangles
Rename Rectangles
Select each rectangle with your Magic Wand
Flood fill black (#000000)
Selections > Modify > Contract by 5
Flood fill black (#000000)
Selections > Modify > Contract by 5
Paste Paper of choice as new layer
Resize by 65%
Selections > Invert
Delete then deselect
Layers > Merge > Merge Down
Activate Frame Back and select with Magic Wand
Selections > Modify > Expand by 5
Paste another Paper of choice as new layer
Resize by 50% and position
Selections > Invert
Delete then deselect
Selections > Modify > Expand by 5
Paste another Paper of choice as new layer
Resize by 50% and position
Selections > Invert
Delete then deselect
Layers > Merge > Merge Down
Activate Frame and select with Magic Wand
Selections > Modify > Expand by 1
Delete to remove grey area
Selections > Modify > Contract by 1
Flood fill with #000000
Deselect
Selections > Modify > Expand by 1
Delete to remove grey area
Selections > Modify > Contract by 1
Flood fill with #000000
Deselect
Activate Rectangle layer
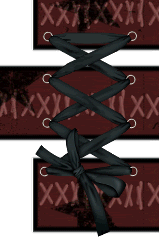
Paste Stitching as new layer
Image > Rotate by 90 to the right
Resize by 94%
Position within the top rectangle
Duplicate, then Image > Flip
Reposition
Duplicate then move into centre rectangle
Image > Rotate by 90 to the right
Resize by 94%
Position within the top rectangle
Duplicate, then Image > Flip
Reposition
Duplicate then move into centre rectangle
Once all Stitches are in place,
Layers > Merge > Merge Down
Repeat
Layers > Merge > Merge Down
Repeat
Set blend mode to Soft Light
Paste TiedRibbonEyelet as new layer
Resize by 65%
Position from bottom of top rectangle to top of bottom rectangle
Resize by 65%
Position from bottom of top rectangle to top of bottom rectangle
Paste Mesh as new layer
Resize by 65%
Position under and protruding from Frame
Duplicate, then Image > Mirror
Position on other side of Frame
Resize by 65%
Position under and protruding from Frame
Duplicate, then Image > Mirror
Position on other side of Frame
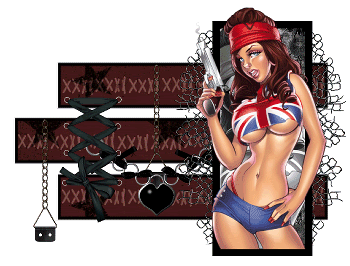
Paste Hanger as new layer
Resize by 45%
Position to the left from centre rectangle
Duplicate, then position from top rectangle
Resize by 45%
Position to the left from centre rectangle
Duplicate, then position from top rectangle
Paste HeartChain as new layer
Resize by 50%
Position to your liking below Mesh and Eyelet Ribbon layers
Resize by 50%
Position to your liking below Mesh and Eyelet Ribbon layers
Paste tube of choice as new layer
Position within and below Frame
Select outside the Frame Back
Activate tube layer and delete
Deselect
Set blend mode to Lumiance
Position within and below Frame
Select outside the Frame Back
Activate tube layer and delete
Deselect
Set blend mode to Lumiance
Paste tube as new layer again
Resize as necessary
Position within and ABOVE Frame and erase any excess to your liking
Resize as necessary
Position within and ABOVE Frame and erase any excess to your liking
Paste Paper of choice as new layer
Layers > Arrange > Send to Bottom
(Move Up above white background)
Layers > Arrange > Send to Bottom
(Move Up above white background)
Layers > New Mask Layer > From Image
Apply WSL_Mask154
OK
Layers > Merge > Merge Group
Apply WSL_Mask154
OK
Layers > Merge > Merge Group
Crop and resize
Select your Text Tool and font of choice
I am using two fonts - AL Fantasy Type and Dirty Ego
Type out text of choice
Position to your liking
Convert to raster layer
Apply drop shadow of choice
I am using two fonts - AL Fantasy Type and Dirty Ego
Type out text of choice
Position to your liking
Convert to raster layer
Apply drop shadow of choice
Select another font of choice
I am using Couch Lover
I am using Couch Lover
Foreground - #680000
Background - #000000
Background - #000000
Type out your name
Position to your liking
Convert to raster layer
Apply drop shadow of choice
Position to your liking
Convert to raster layer
Apply drop shadow of choice
Finally, add your © copyright, licence and watermark, then save as a GIF or JPG and you're done!
** IF YOU WISH TO ANIMATE PLEASE FOLLOW THESE NEXT STEPS **
Activate your Tube layer layer
Duplicate it FIVE times for a total of SIX layers
Rename Fade1, Fade2, Fade3, Fade4, Fade5 and Fade6
Duplicate it FIVE times for a total of SIX layers
Rename Fade1, Fade2, Fade3, Fade4, Fade5 and Fade6
Lower the opacity on each of the layers:
Fade1 - 100%
Fade2 - 80%
Fade3 - 60%
Fade4 - 40%
Fade5 - 20%
Fade6 - 10%
Fade1 - 100%
Fade2 - 80%
Fade3 - 60%
Fade4 - 40%
Fade5 - 20%
Fade6 - 10%
Now for the animation!
Hide Fade2 through to Fade6
Edit > Copy Merged
Edit > Copy Merged
Open Animation Shop
Edit > Paste as New Animation
Edit > Paste as New Animation
Back to PSP
Hide Fade1 and activate Fade2
Edit > Copy Merged
Hide Fade1 and activate Fade2
Edit > Copy Merged
In Animation Shop
Edit > Paste AFTER Current Frame
Edit > Paste AFTER Current Frame
Back to PSP
Hide Fade2 and activate Fade3
Edit > Copy Merged
Hide Fade2 and activate Fade3
Edit > Copy Merged
In Animation Shop
Edit > Paste AFTER Current Frame
Edit > Paste AFTER Current Frame
Repeat through to Fade6, then
Hide ALL Fade1 through to Fade6 layers with only the black background visible
Edit > Copy Merged
In Animation Shop
Edit > Paste AFTER Current Frame
You should now have a total of SEVEN frames
Select all > Frame Properties to 15, then
Activate LAST FRAME ONLY and change the Properites of this Frame to 100
Save as a GIF and you're done!
Thanks for trying my tutorial!
::st!na::
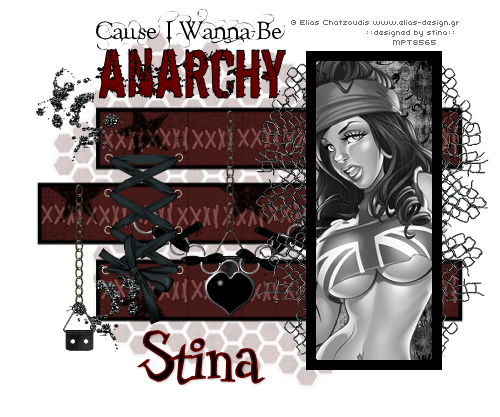
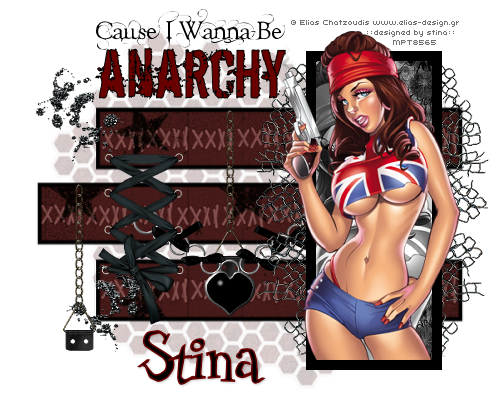
Here are two non-animated versions:
© Tutorial written by Stina on 24th April 2009
All rights reserved
No comments:
Post a Comment