
Supplies
Scrap kit of choice - I am using the final edition to the Saga Collection "The Wolf Pack" by Pimp'd Dezigns available from Twilight Scraps, Stargazer Scraps and Paradise 4 Scrappers
Image of choice - I am using the lovely artwork of Beverly Lu Latter which is free to use provided proper credit is included
WSL_Mask7 by Chelle available from her blog
Fonts of choice - I am using AL Afternoon Delight and AL Age Old Love
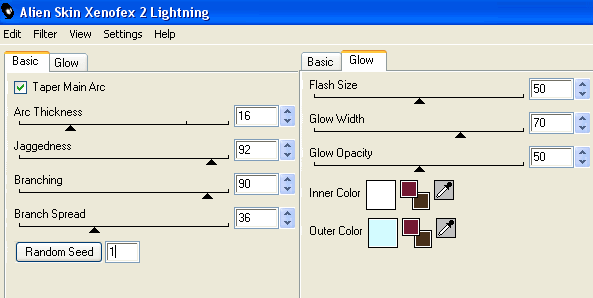
Plugins: Alien Skin Xenofex 2 Lightning
Alien Skin Eye Candy 5: Impact Gradient Glow
Eye Candy 4000 Gradient Glow (Optional for text)
Ready? Let's begin....
Open a new 700 x 550 blank canvas flood-filled white
Paste Frame02 as new layer
Image > Rotate by 90 to the right
Image > Mirror, then
Resize by 75%
Image > Rotate by 90 to the right
Image > Mirror, then
Resize by 75%
Select the area inside the Frame with Magic Wand
Selections > Modify > Expand by 20
Selections > Modify > Expand by 20
Paste Image of choice as new layer
Resize to liking to fit within Frame
Selections > Invert
Delete, then deselect
Resize to liking to fit within Frame
Selections > Invert
Delete, then deselect
Paste Journal as new layer
Layers > Arrange > Send to Bottom
Duplicate and bring that layer to top
Layers > Arrange > Send to Bottom
Duplicate and bring that layer to top
Use your Freehand tool to draw around portions of the Journal tag and Ribbon
Selections > Modify > Feather by 1
Press delete once or twice
Selections > Modify > Feather by 1
Press delete once or twice

Then deselect
Select the Green bow in the upper right with your Magic Wand
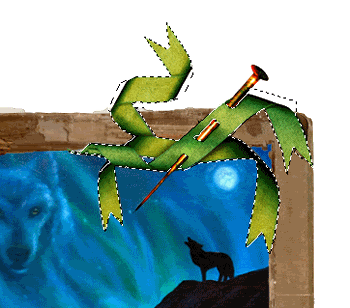
Then got to Adjust > Hue & Saturation > Colourise with the following settings:
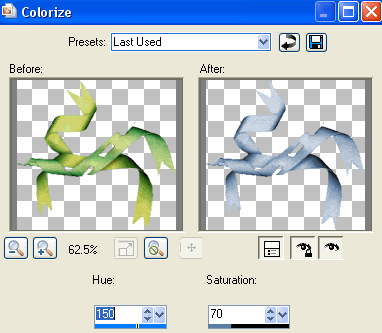
KEEP SELECTED!!
Set the blend mode to Multiply, then
Layers > Promote Selection to Layer
Set Promoted Layer to Multiply also
Deselect
Layers > Promote Selection to Layer
Set Promoted Layer to Multiply also
Deselect
Paste Twig as new layer
Image > Rotate by 10 to the left
Resize by 35%
Position in lower right
Image > Rotate by 10 to the left
Resize by 35%
Position in lower right
Paste PawPrints as new layer
Resize by 45%
Layers > Arrange > Move Down
Resize by 45%
Layers > Arrange > Move Down
Position to the right beneath the Ribbon
Duplicate, then
Image > Rotate by 25 to the left
Erase the paws covering the image, leaving about three placed over the bottom of Frame
Image > Rotate by 25 to the left
Erase the paws covering the image, leaving about three placed over the bottom of Frame
Place another single pawprint at the top
Resize these by 90%
Resize these by 90%
Paste Greens03 as new layer
Image > Mirror
Image > Rotate by 10 to the right
Resize by 42%
Image > Mirror
Image > Rotate by 10 to the right
Resize by 42%
Position to the left below Frame
Paste Greens04 as new layer
Layers > Arrange > Bring to top again
Resize by 35%
Position in lower left joining the bottom branch
Layers > Arrange > Bring to top again
Resize by 35%
Position in lower left joining the bottom branch
Paste Flowers03 as new layer
Image > Rotate by 90 to the right
Resize by 30%
Position to the lower left as above, then
Carefully erase the leaves
Image > Rotate by 90 to the right
Resize by 30%
Position to the lower left as above, then
Carefully erase the leaves
Paste Rusty Charm as new layer
Layers > Arrange > Bring to Top
Image > Rotate by 10 to the right
Resize by 45%
Position to the left over Paperfold and branch
Layers > Arrange > Bring to Top
Image > Rotate by 10 to the right
Resize by 45%
Position to the left over Paperfold and branch
Paste Bow02 as new layer
Resize by 55%
Position in upper left joining the Charm and PaperFold to the Frame
Resize by 55%
Position in upper left joining the Charm and PaperFold to the Frame
Duplicate then set blend mode to Multiply
Lower opacity to 60, then
Layers > Merge > Merge Down
Lower opacity to 60, then
Layers > Merge > Merge Down
Paste ButtonGroup as new layer
Resize by 55%
Position over the Bow
Resize by 55%
Position over the Bow
Paste FlowerGroup as new layer
Image > Rotate by 90 to the left
Resize by 60%
Position along bottom of Frame
Image > Rotate by 90 to the left
Resize by 60%
Position along bottom of Frame
Open Mesh image
Grab your Selection Tool and in your Tool Options Palette where it says "Crate Selection from" select the Layer Opaque (middle)
This will make a selection around the Mesh
Grab your Selection Tool and in your Tool Options Palette where it says "Crate Selection from" select the Layer Opaque (middle)
This will make a selection around the Mesh
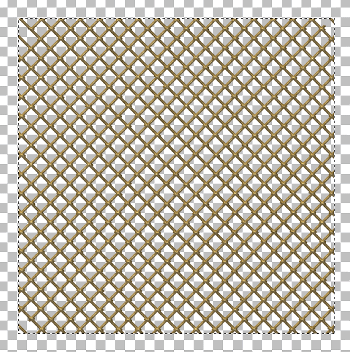
Image > Crop to Selection
Now in your Materials Palette click on the Patterns tab and locate your Mesh pattern
Set the Scale to 70; Angle at 0
On your working canvas add a new raster layer
Layers > Arrange > Send to Bottom
Flood-fill with Mesh
Layers > Arrange > Send to Bottom
Flood-fill with Mesh
Layers > New Mask Layer > From Image
Locate WSL_Mask7
OK
Layers > Merge > Merge Group
Locate WSL_Mask7
OK
Layers > Merge > Merge Group
Paste Notepaper as new layer
Image > Rotate by 15 to the right
Resize by 55%
Position to the right and slightly protruding
Image > Rotate by 15 to the right
Resize by 55%
Position to the right and slightly protruding
Paste Moon as new Layer
Duplicate then set blend mode to Screen
Layers > Merge > Merge Down
Dulicate again and set blend mode to Screen once more
Layers > Merge > Merge Down
Duplicate then set blend mode to Screen
Layers > Merge > Merge Down
Dulicate again and set blend mode to Screen once more
Layers > Merge > Merge Down
Resize by 45%
Position in upper left behind greenery etc
Position in upper left behind greenery etc
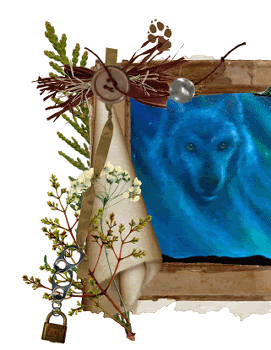
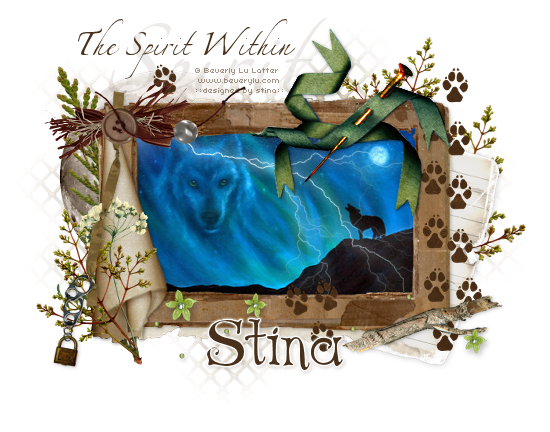
Resize tag and add any drop shadows of choice
Select your Text Tool and font of choice
I am using AL Afternoon Delight
Text colour is #48301a
I am using AL Afternoon Delight
Text colour is #48301a
Type out your text and position
Convert to raster layer
Select another font of choice
I am using AL Age Old Love
Type out your name
Objects > Align > Horizontal Centre in Canvas
Convert to raster layer
Apply a small Gradient Glow and drop shadow of choice
Objects > Align > Horizontal Centre in Canvas
Convert to raster layer
Apply a small Gradient Glow and drop shadow of choice
Finally, add your © copyright, licence and watermark, then save as a GIF or JPG and you're done!
** IF YOU WISH TO ANIMATE THE EYES PLEASE FOLLOW THESE NEXT STEPS **
Activate the Image Layer
Duplicate twice and rename Eyes1, Eyes2 and Eyes3
Hide Eyes2 and Eyes3 activating only Eyes1
Duplicate twice and rename Eyes1, Eyes2 and Eyes3
Hide Eyes2 and Eyes3 activating only Eyes1
With your Freehand Tool or Selection Tool on eclipse (whichever you find easiest) draw out two small circles around the Wolf's eyes
Selections > Modify > Feather by 2
Effects > Plugins > Alien Skin Eye Candy 5: Impact > Gradient Glow with the following settings:
Selections > Modify > Feather by 2
Effects > Plugins > Alien Skin Eye Candy 5: Impact > Gradient Glow with the following settings:
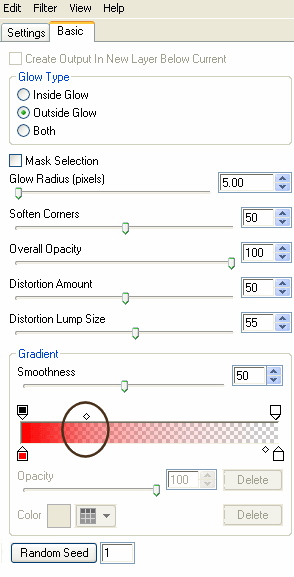
*Please note the position of slider*
KEEP SELECTED!!
Hide Eyes1 and activate Eyes2
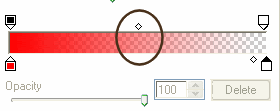
Apply the Glow effect, adjusting the Gradient colour slider up to halfway
Apply the Glow effect, adjusting the Gradient colour slider up to halfway
Hide Eyes2 and activate Eyes3
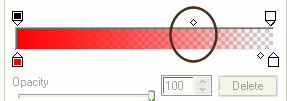
Apply the Glow effect again, adjusting the Gradient colour slider up to three quarters of the way
Deselect
Hide Eyes2 and Eyes3 with only Eyes1 visible
Edit > Copy Merged
Open Animation Shop
Edit > Paste as New Animation
Back to PSP
Hide Eyes1 and activate Eyes2
Edit > Copy Merged
In Animation Shop
Edit > Paste AFTER Current Frame
Back to PSP
Hide Eyes2 and activate Eyes3
Edit > Copy Merged
In Animation Shop
Edit > Paste AFTER Current Frame
Select All and adjust Frame Properties to 30, then save as a GIF and you're done!
** IF YOU WISH TO ANIMATE WITH LIGHTNING PLEASE FOLLOW THESE NEXT STEPS **
Activate the Image Layer
Duplicate twice and rename Lightning1, Lightning2 and Lightning3
Hide Lightning2 and Lightning3 activating only Lightning1
Effects > Plugins > Xenofex 2 > Lightning with the following settings:
Hide Lightning1 and activate Lightning2
Apply the Lightning effect, adjusting the Random Seed
Hide Lightning2 and activate Lightning3
Apply the Lightning effect again, adjusting the Random Seed once more
Hide Lightning2 and Lightning3 with only Lightning1 visible
Edit > Copy Merged
Open Animation Shop
Edit > Paste as New Animation
Back to PSP
Hide Lightning1 and activate Lightning2
Edit > Copy Merged
In Animation Shop
Edit > Paste AFTER Current Frame
Back to PSP
Hide Lightning2 and activate Lightning3
Edit > Copy Merged
In Animation Shop
Edit > Paste AFTER Current Frame
Select All and adjust Frame Properties to 40, then save as a GIF and you're done!
Thanks for trying my tutorial!
::st!na::
::st!na::
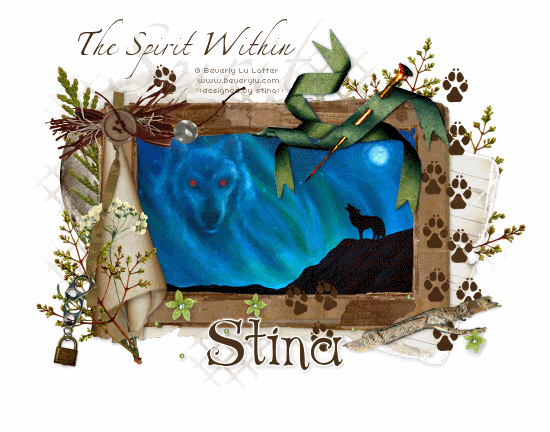
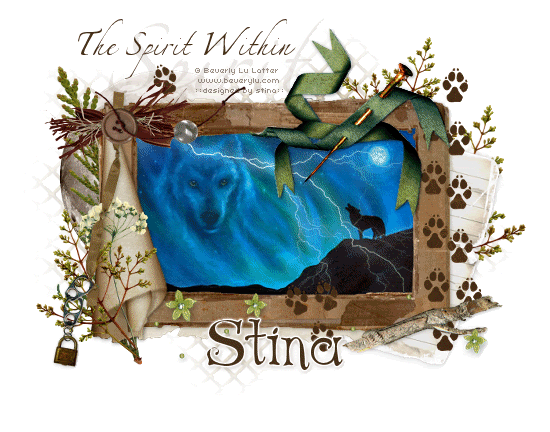
Here is a non-animated version:
© Tutorial written by Stina on 27th May, 2009
All rights reserved
No comments:
Post a Comment