
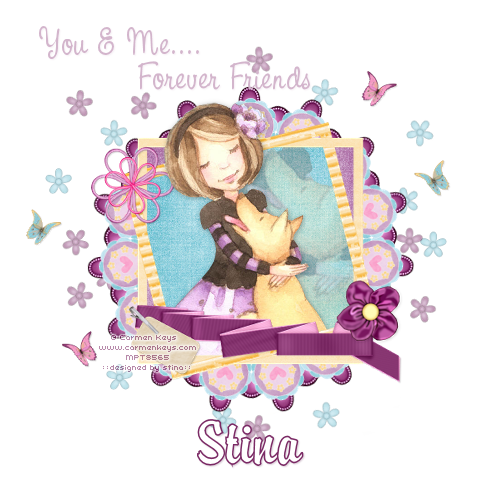
Supplies
Scrap kit of choice - I am using the lovely "Forever Friends" by Lynn of Moo Designs available from The Scrapping Divaz Designz
Tube of choice - I am using the lovely artwork of Carmen Keys which can be purchased from My PSP Tubes
**PLEASE DO NOT USE HER ARTWORK WITHOUT THE APPROPRIATE LICENCE**
Fonts of choice - I am using CAC Pinafore and Brody
Plugin: Mura Meister Copies
Ready? Let's go....
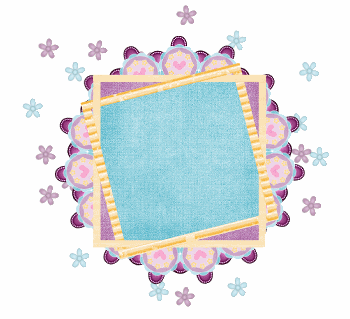
Open a new 700 x 700 blank canvas flood-filled white
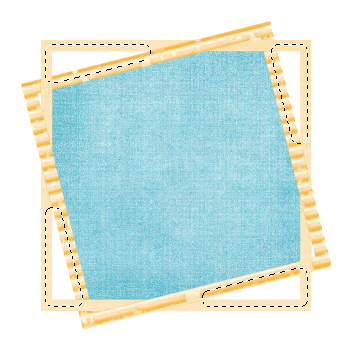
Paste Frame2 as new layer
Resize by 15%
Resize by 15%
Select the inside of the Frame with your Magic Wand
Selections > Modify > Expand by 8
Add new raster layer
Paste a paper of choice INTO selection
Deselect
Selections > Modify > Expand by 8
Add new raster layer
Paste a paper of choice INTO selection
Deselect
Layers > Arrange > Move Down
Select the inside of the outer Frame with your Magic Wand
Selections > Modify > Expand by 8
Selections > Modify > Expand by 8
Activate the layer with the first Paper on
Paste INTO selection
Deselect
Paste INTO selection
Deselect
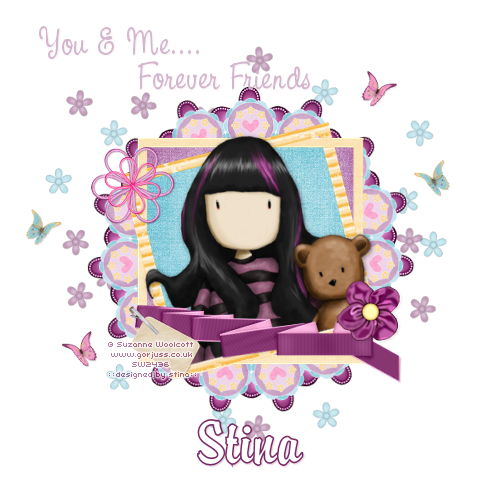
Paste a Flower of choice as new layer
Resize by 10%
Resize by 10%
Effects > Plugins > Mura Meister > Copies with the following settings:
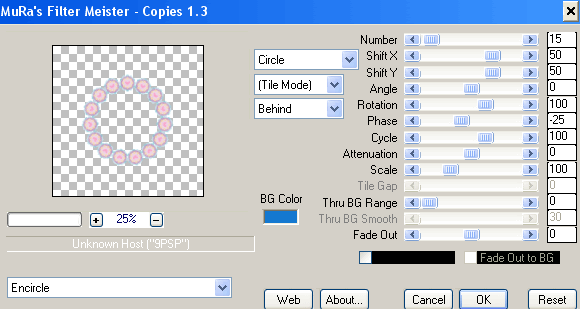
Layers > Arrange > Send to Bottom
Paste another darker flower of choice as new layer
Resize by 6%
Repeat the Plugin effect with the settings above
Resize by 6%
Repeat the Plugin effect with the settings above
Layers > Arrange > Send to Bottom
Adjust > Brightness/Contrast > Clarify with a setting of 5.0
Repeat
Repeat
Now paste a pearl flower as new layer
Resize by 2%
Resize by 2%
LEAVE IN POSITION
Selections > Select All
Selections > Modify > Contract by 40
Selections > Modify > Contract by 40
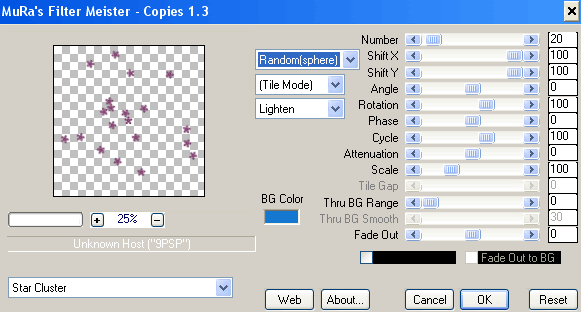
Effects > Plugin > Mura Meister > Copies with the following settings:
Paste another pearl flower as new layer
Resize by 2%
Resize by 2%
Repeat Mura Meister plugin with the settings above
(You may need to play with the settings a little to have a scatter pattern you like)
(You may need to play with the settings a little to have a scatter pattern you like)
Lower opacity of layers to 50
Paste a StringFlower as new layer
Resize by 8%
Position in upper left
Resize by 8%
Position in upper left
Paste the ClippedRibbon as new layer
Resize by 10%
Position along bottom of Frame
Resize by 10%
Position along bottom of Frame
Paste a Satin Flower as new layer
Resize by 5%
Position in lower right
Resize by 5%
Position in lower right
Paste two Butterlies as new layers
Resize by 5%
Duplicate and Image > Mirror
Position them to your liking
Resize by 5%
Duplicate and Image > Mirror
Position them to your liking
Paste your tube as new layer
Image > Rotate by 15 to the left
Resize as necessary
Position within Frame BEHIND Clipped Ribbon and Satin Flower
Image > Rotate by 15 to the left
Resize as necessary
Position within Frame BEHIND Clipped Ribbon and Satin Flower
Select your text Tool and font of choice
I am using CAC Pinafore
I am using CAC Pinafore
Set your Background to a colour that matches your tag - I am using #d3b5cc
Type out some text of your choice
Position to your liking
Convert to raster layer and apply a slight drop shadow
Position to your liking
Convert to raster layer and apply a slight drop shadow
Select your Text Tool again and another font of choice
I am using Brody
I am using Brody
Set your Foreground a dark colour from your tag - I am using #7b2a65
And your Foreground to a lighter colour from your tube - I am using #FFFFFF
And your Foreground to a lighter colour from your tube - I am using #FFFFFF
Type out your name
Objects > Align > Horizontal Centre in Canvas
Convert to raster layer
Apply a drop shadow:
H & V - 1
Opacity - 20
Blur - 2.00
Colour - #4f1340
Objects > Align > Horizontal Centre in Canvas
Convert to raster layer
Apply a drop shadow:
H & V - 1
Opacity - 20
Blur - 2.00
Colour - #4f1340
Finally, add your © copyright, licence and watermark, then save as a GIF or JPG and you're done!
Thanks for trying my tutorial!
::st!na::
::st!na::
Here is another version:
© Tutorial written by Stina on 12th May 2009
All rights reserved
All rights reserved
No comments:
Post a Comment