
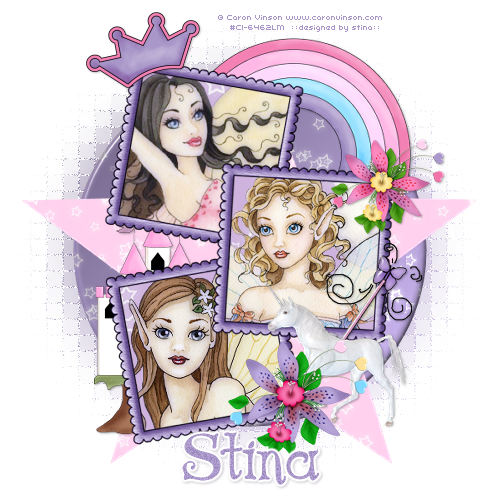
Supplies
Scrap kit of choice - I am using "Spring Fairy Tales" by Tootie's Creationz available from Paradise 4 Scrappers and Stargazer Scraps
Tubes of choice - I am using the magical artwork of Caron Vinson which is available for purchase from CILM
**PLEASE DO NOT USE HER ARTWORK WITHOUT THE APPROPRIATE LICENCE**
Font of choice - I am using AL Age Old Love
Plugins: Eye Candy 4000 Glass and Gradient Glow
Xero Porcelain
Ready? Let's begin...
Open a new 600 x 600 blank canvas flood-filled white
Open a Paper of choice from your scrap kit
Set it to your Background in your Materials Palette
Open your Palette on Pattern and set the scale to 50
Set it to your Background in your Materials Palette
Open your Palette on Pattern and set the scale to 50
Select your Preset Shape Tool and set to Ellipse
Holding your Shift key down draw out a circle with your Paper
Objects > Align > Centre in Canvas
Convert to raster layer
Convert to raster layer
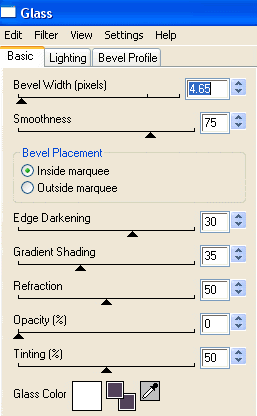
Effects > Plugins > Eye Candy 4000 > Glass with the following settings:
Set your Preset Shape Tool to a Star shape
Hold your Shift key down again and draw out the Star
Hold your Shift key down again and draw out the Star
Objects > Align > Centre in Canvas
Convert to raster layer
Convert to raster layer
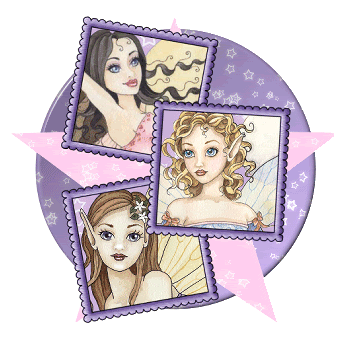
Paste a Triple Frame as new layer
Resize by 60%
Resize by 60%
With your Magic Wand select the inside of each Frame
Selections > Modify > Expand by 10
Paste a paper of choice as new layer
Selections > Invert
Delete and deselect
Selections > Modify > Expand by 10
Paste a paper of choice as new layer
Selections > Invert
Delete and deselect
Open three tubes of choice
Paste each within each Frame and resize as necessary
Position to your liking
Paste each within each Frame and resize as necessary
Position to your liking
With your Magic Wand select the first Frame
Selections > Modify > Expand by 10
Selections > Invert
Delete and deselect
Selections > Modify > Expand by 10
Selections > Invert
Delete and deselect
Repeat this step for the other two Frames
Hide your Background, Circle, Star, Frame Background and Frame
Layers > Merge > Merge Visible
Layers > Merge > Merge Visible
Effects > Plugins > Xero > Porcelain with default settings
Then Unhide all layers again
Paste FairyWand as new layer
Resize by 30%
Position in lower right of bottom Frame
Repeat Glass effect as above
Resize by 30%
Position in lower right of bottom Frame
Repeat Glass effect as above
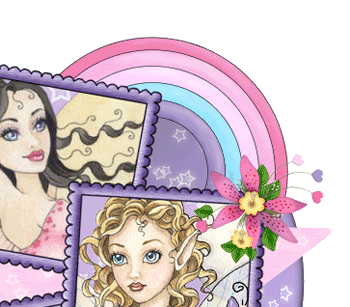
Paste a Flower of choice as new layer
Resize by 25%
Place over the Wand in the lower right and resposition both as necessary
Resize by 25%
Place over the Wand in the lower right and resposition both as necessary
Paste another Flower
Resize by 20%
Position in upper right of middle Frame
Resize by 20%
Position in upper right of middle Frame
Paste Crown as new layer
Image > Rotate by 20 to the left
Resize by 25%
Position in upper left of top Frame
Image > Rotate by 20 to the left
Resize by 25%
Position in upper left of top Frame
Paste Unicorn as new layer
Resize by 20%
Position in lower left behind Flower layer
Resize by 20%
Position in lower left behind Flower layer
Paste Castle as new layer
Resize by 35%
Position to the left then move down to between the Star and Frame Background layers
Resize by 35%
Position to the left then move down to between the Star and Frame Background layers
Paste Rainbow as new layer
Image > Rotate by 20 to the right
Resize by 35%
Position in the upper right between the top and middle Frames
Image > Rotate by 20 to the right
Resize by 35%
Position in the upper right between the top and middle Frames
Activate the Circle layer we drew at the beginning and duplicate
On the bottom layer go to:
On the bottom layer go to:
Adjust > Blur > Gaussian Blur with a radius of 20.00
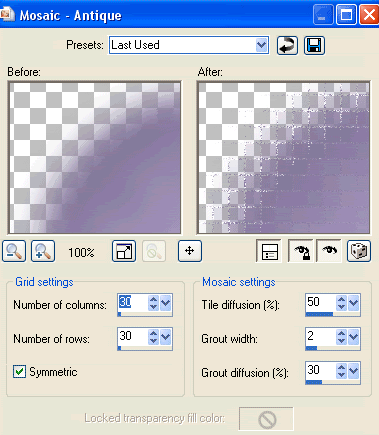
Then go to Effects > Texture Effects > Mosaic Antique with the following settings:
Select your Text Tool and font of choice
I am using AL Age Old Love
Choose a colour from your tag and set it as your background
I am using #a997c9
I am using AL Age Old Love
Choose a colour from your tag and set it as your background
I am using #a997c9
Type out your name
Objects > Align > Horizontal Centre in Canvas
Convert to raster layer
Objects > Align > Horizontal Centre in Canvas
Convert to raster layer
Apply a Gradient Glow using Eye Candy 4000, and a drop shadow of choice
Finally, add your © copyright, licence and watermark, then save as a GIF or JPG and you're done!
Thanks for trying my tutorial!
::st!na::
::st!na::
© Tutorial written by Stina on 17th May 2009
All rights reserved
No comments:
Post a Comment