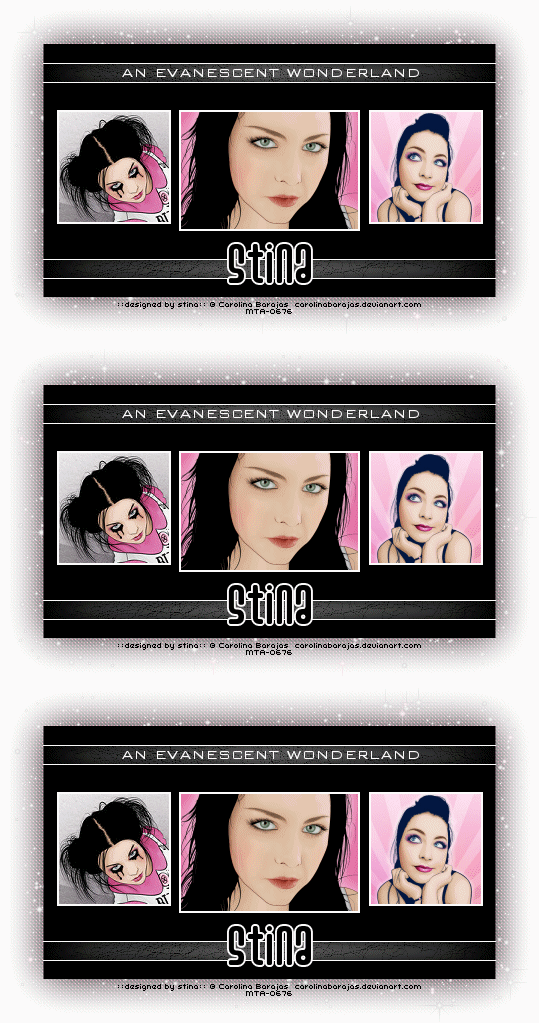
Supplies
Images of choice - I am using the work of Carolina Barajas available to use with copyright credits
Plugin: Penta.com > Jeans
Plugin: Alien Skin Xenofex 2.0 Constellation (for animation)
Fonts of choice - I am using Bank GothicBT and Ashbury
My supplies consisting of 3 Selections made by me, here
Plugin: Penta.com > Jeans
Plugin: Alien Skin Xenofex 2.0 Constellation (for animation)
Fonts of choice - I am using Bank GothicBT and Ashbury
My supplies consisting of 3 Selections made by me, here
This is fairly easy tutorial using Selections.
Ready? Let's begin...
Open a new 600 x 400 blank canvas flood-filled white
Add a new raster layer
Selections > Load/Save Selection > Load Selection from Disk
Find Evanescent #1 and load
You will have a blank selection with marching ants around it
Find Evanescent #1 and load
You will have a blank selection with marching ants around it
Flood fill area black then deselect
Set your Materials Palette with your Background and Foreground on #FFFFFF
In your Palette click the Foreground to bring up the Material Properties box
Select the Gradient tab then Fading Foreground with the following settings:
In your Palette click the Foreground to bring up the Material Properties box
Select the Gradient tab then Fading Foreground with the following settings:
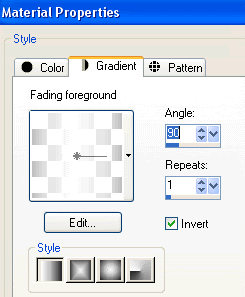
Selections > Load/Save Selection > Load from Disk
Find Evanescent #2 and load
Flood fill area with #FFFFFF (white)
Find Evanescent #2 and load
Flood fill area with #FFFFFF (white)
KEEP SELECTED!!
Selections > Modify > Contract by 1
Add new raster layer
Flood fill with your Gradient then lower opacity to 50
Add new raster layer
Flood fill with your Gradient then lower opacity to 50

Deselect
Effects > Texture Effects > Fine Leather with the following settings:
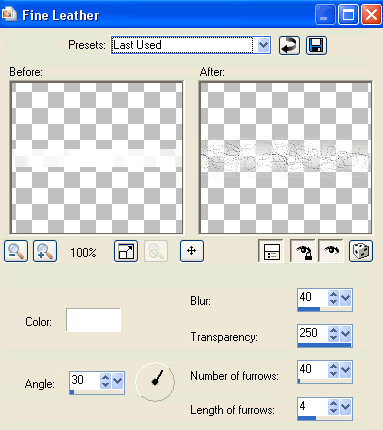
Now let's remove the excess this effect created
Select the area around your white border with your Magic Wand
Select the area around your white border with your Magic Wand

Selections > Modify > Contract by 1
On the layer we just applied the Fine Leather press delete
Deselect
Layers > Merge > Merge Down
On the layer we just applied the Fine Leather press delete
Deselect
Layers > Merge > Merge Down
Duplicate then Image > Flip
Then Layers > Merge > Merge Down again
Select the area outside your Black Rectangle with your Magic Wand
Activate the small rectangles and press delete
Deselect
Then Layers > Merge > Merge Down again
Select the area outside your Black Rectangle with your Magic Wand
Activate the small rectangles and press delete
Deselect
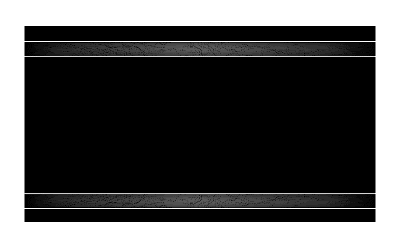
You should now have something like this:
Add new raster layer
Selections > Load/Save Selection > Load from Disk
Find Evanescent #3
Flood fill each of the squares with white
Selections > Load/Save Selection > Load from Disk
Find Evanescent #3
Flood fill each of the squares with white
Selections > Modify > Contract by 2
Delete
Delete
Now let's add our images
With your Magic Wand select the first Frame
Selections > Modify > Expand by 1
Paste your first image as new layer
Layers > Arrange > Move Down
Position and resize to fit in frame
Selections > Invert
Delete then deselect
Selections > Modify > Expand by 1
Paste your first image as new layer
Layers > Arrange > Move Down
Position and resize to fit in frame
Selections > Invert
Delete then deselect
Select the next Frame
Selections > Modify > Expand by 1
Paste your second image as new layer
Layers > Arrange > Move Down
Position and resize to fit in frame
Selections > Invert
Delete then deselect
Selections > Modify > Expand by 1
Paste your second image as new layer
Layers > Arrange > Move Down
Position and resize to fit in frame
Selections > Invert
Delete then deselect
Select the last Frame
Selections > Modify > Expand by 1
Paste your third image as new layer
Layers > Arrange > Move Down
Position and resize to fit in frame
Selections > Invert
Delete then deselect
Selections > Modify > Expand by 1
Paste your third image as new layer
Layers > Arrange > Move Down
Position and resize to fit in frame
Selections > Invert
Delete then deselect
Hide all your layers except for the images and Frames
Layers > Merge > Merge Visible
Unhide layers again
Layers > Merge > Merge Visible
Unhide layers again
Activate your Black Rectangle layer
Duplicate
On bottom rectangle go to
Adjust > Blur > Gaussian Blur with a Radius of 20.00
Duplicate
On bottom rectangle go to
Adjust > Blur > Gaussian Blur with a Radius of 20.00
Effects > Texture Effects > Weave with the following settings:
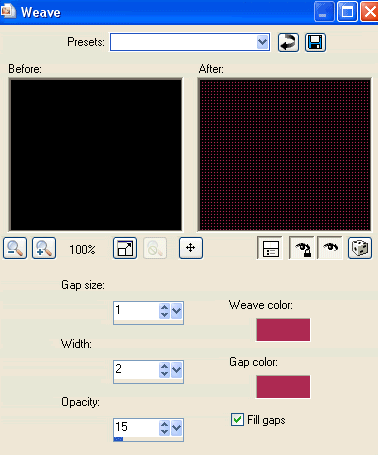
Then, Effects > Plugins > Penta.com > Jeans with the following settings:

Select your Text Tool and font of choice
I am using Bank Gothic BT
Set your Background to #FFFFFF
Type out your text of choice
Objects > Align > Horizontal Centre in Canvas
Convert to raster layer
I am using Bank Gothic BT
Set your Background to #FFFFFF
Type out your text of choice
Objects > Align > Horizontal Centre in Canvas
Convert to raster layer
Select another font of choice
I am using Ashbury
Toggle the colours in your Material Palette so that your Foreground is #FFFFFF and your Background is #000000
I am using Ashbury
Toggle the colours in your Material Palette so that your Foreground is #FFFFFF and your Background is #000000
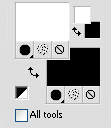
Type out your name
Objects > Align > Horizontal Centre in Canvas
Convert to raster layer
Objects > Align > Horizontal Centre in Canvas
Convert to raster layer
Finally, add any © copyright, licence and watermark, then save as a GIF or JPG and you're done!
IF YOU WOULD LIKE TO ADD ANIMATION PLEASE READ ON
Activate your background layer
Duplicate twice
Rename Sparkle1, Sparkle2 and Sparkle3
Duplicate twice
Rename Sparkle1, Sparkle2 and Sparkle3
Hide Sparkle2 and Sparkle3
Activate Sparkle1
Selections > Select All
Selections > Float
Selections > Defloat
Selections > Modify > Contract by 15
Activate Sparkle1
Selections > Select All
Selections > Float
Selections > Defloat
Selections > Modify > Contract by 15
Effects > Plugins > Alien Skin Xenofex 2.0 > Constellation with the following settings:
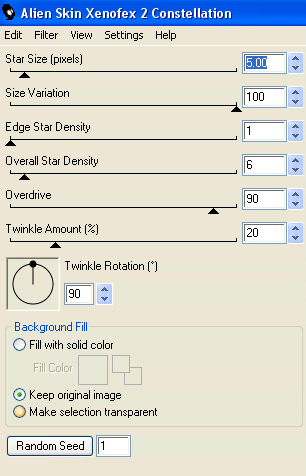
KEEP SELECTED!!
Hide Sparkle1 and activate Sparkle2
Repeat Constellation effect, adjusting the Randon Seed
Repeat Constellation effect, adjusting the Randon Seed
Hide Sparkle2 and activate Sparkle3
Repeat Constellation effect again, adjusting the Randon Seed
Repeat Constellation effect again, adjusting the Randon Seed
Deselect
Hide Sparkle2 and Sparkle3 again
Activate Sparkle1
Edit > Copy Merged
Activate Sparkle1
Edit > Copy Merged
Open Animation Shop
Edit > Paste as new animation
Edit > Paste as new animation
Back to PSP
Hide Sparkle1 and activate Sparkle2
Edit > Copy Merged
Hide Sparkle1 and activate Sparkle2
Edit > Copy Merged
In Animation Shop
Edit > Paste AFTER Current Frame
Edit > Paste AFTER Current Frame
Back to PSP
Hide Sparkle2 and activate Sparkle3
Edit > Copy Merged
Hide Sparkle2 and activate Sparkle3
Edit > Copy Merged
In Animation Shop
Edit > Paste After Current Frame
Edit > Paste After Current Frame
Finally save as GIF and you're done!
Thanks for trying my tutorial!
::st!na::
Here is a non-animated version:

© Tutorial written by Stina on 7th May 2009
All rights reserved

No comments:
Post a Comment