
Supplies
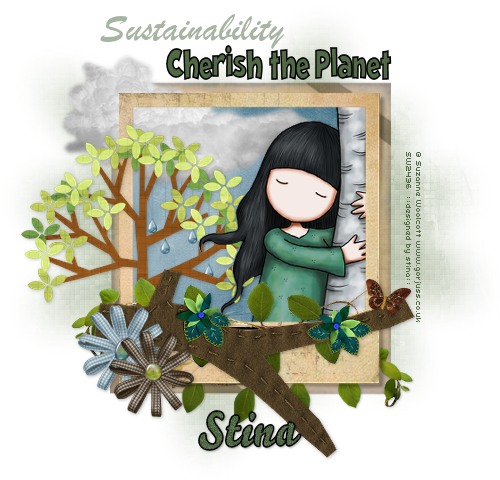
"Earth Day" freebie kit available at Pimp'd Dezigns
Tube of choice - I am using the lovely artwork of Suzanne Woolcott which can be purchased from her store
WSL_Mask7 by Chelle available from her blog
Plugin: Xero Fritillary
Fonts of choice - I am using CK Retro Block, Brush Script MT and Bello Script
Ready? Let's go!
Open a new 650 x 650 blank canvas flood-filled white
Paste Frame01 as new layer
Resize by 70%
Leave in position
Resize by 70%
Leave in position
Select inner area of Frame with Magic Wand
Selections > Modify > Expand by 10
Add new raster layer
Paste PP06 into selection
Deselect
Layers > Arrange > Move Down
Selections > Modify > Expand by 10
Add new raster layer
Paste PP06 into selection
Deselect
Layers > Arrange > Move Down
Paste Cloud as new layer
Resize by 60%
Position to the upper left
Resize by 60%
Position to the upper left
Paste TreeBranch as new layer
Layers > Arrange > Bring to Top
Resize by 60%
Position along bottom of Frame
Layers > Arrange > Bring to Top
Resize by 60%
Position along bottom of Frame
Paste Greens as new layer
Resize by 70%
Layers > Arrange > Move Down
Position below and along Branch
Resize by 70%
Layers > Arrange > Move Down
Position below and along Branch
Paste your tube as new layer
Resize as necessary
Position to the right beneath Frame layer
Resize as necessary
Position to the right beneath Frame layer
Paste Tree as new layer
Resize by 35%
Position to the left
Resize by 35%
Position to the left
Activate your tube layer
Select the area around your tube
Selections > Invert
Now activate the Tree layer
Press delete
Select the area around your tube
Selections > Invert
Now activate the Tree layer
Press delete

Paste Bow01 as new layer
Layers > Arrange > Bring to Top
Resize by 20%
Position to the left
Layers > Arrange > Bring to Top
Resize by 20%
Position to the left
Paste Bow02 as new layer
Resize by 16%
Position alongside first Bow
Resize by 16%
Position alongside first Bow
Paste Butterfly as new layer
Image > Mirror
Resize by 10%
Position to the right above the Branch
Image > Mirror
Resize by 10%
Position to the right above the Branch
Activate Paper Background layer
Paste WaterDrop as new layer (behind Tree)
Resize by 30%
Position as if falling from the sky
Duplicate several times and position
Resize by 30%
Position as if falling from the sky
Duplicate several times and position
Layers > Merge > Merge Down
Repeat till all WaterDrops are one layer
Repeat till all WaterDrops are one layer
Paste Frame02 as new layer
Layers > Arrange > Send to Bottom
Resize by 74%
Position behind Frame
Select Pick Tool and use nodes to pull side out to same size as first Frame
Lower opacity to around 55
Layers > Arrange > Send to Bottom
Resize by 74%
Position behind Frame
Select Pick Tool and use nodes to pull side out to same size as first Frame
Lower opacity to around 55
Use your Selection Tool to draw around overhanging ribbon
Press delete then deselect
Activate Leaf layer
Duplicate
Image > Mirror
Move down to bottom Frame layer
Position to the right, protruding from the bottom of Frame
Duplicate
Image > Mirror
Move down to bottom Frame layer
Position to the right, protruding from the bottom of Frame
Paste PP04 as new layer
Layers > Arrange > Send to Bottom
Layers > Arrange > Send to Bottom
Image > Canvas to 600 x 600
Layers > New Mask Layer > From Image
Locate WSL_Mask7
OK
Layers > Merge > Merge Down
Locate WSL_Mask7
OK
Layers > Merge > Merge Down
Crop around mask layer
Then resize tag (I resized to 500 x 480)
Then resize tag (I resized to 500 x 480)
Still on Mask layer
Effects > Plugins > Xero > Fritillary with the following settings:
Effects > Plugins > Xero > Fritillary with the following settings:
Select your Text Tool and font of choice
I am using CK Retro Block
I am using CK Retro Block
Choose two colours from your tube/tag
Set your Material Properties:
Foreground - #000000
Background - #516945
Stroke width - 1.5
Set your Material Properties:
Foreground - #000000
Background - #516945
Stroke width - 1.5
Type out your text - "Cherish the Planet"
Position and convert to raster layer
Position and convert to raster layer
Select a script font
I am using Brush Script MT
Turn off the Foreground using only the Background colour
I am using Brush Script MT
Turn off the Foreground using only the Background colour
Type out the word - "Sustainability"
Position and convert to raster layer
Lower opacity to 50
Position and convert to raster layer
Lower opacity to 50
Select another font of choice or use one of those already used
Type out your name
Objects > Align > Horiztonal Centre in Canvas
Convert to raster layer
Add a slight drop shadow
Type out your name
Objects > Align > Horiztonal Centre in Canvas
Convert to raster layer
Add a slight drop shadow
Finally, add your © copyright, licence and watermark, then save as a GIF or JPG and you're done!
Thanks for trying my tutorial!
::st!na::
© Tutorial written by Stina on 23rd April 2009
All rights reserved
All rights reserved
No comments:
Post a Comment