
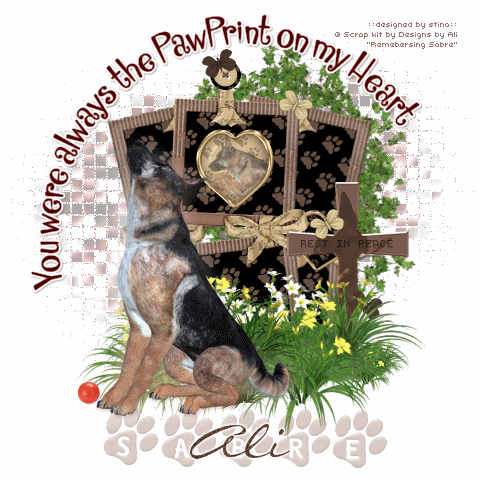
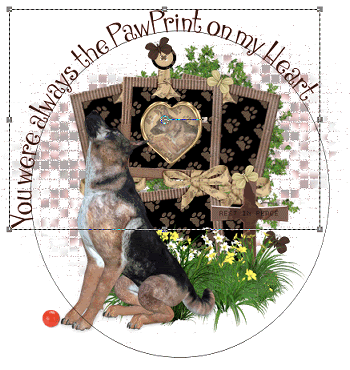
This tutorial is written and dedicated to Ali, who created the scrap kit in memory of her beloved German Shepherd Sabre
Supplies
Scrap kit of choice - I am using the RSPCA charity kit "Remembering Sabre" by Designs by Ali available from Stargazer Scraps
Tube of choice - I am using one from the scrap kit
WSL_Mask170 by Chelle available from her blog
Pawprint Alpha by Created by Jill available from Exquisite Scraps or Scrappin Divaz
Plugin: Eye Candy 4000 Gradient Glow
Fonts of choice - I am using Cinderella ITC TT and LiorahBT
Let's get started!!
Open a new 600 x 600 blank canvas flood-filled white
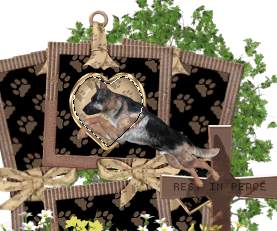
Paste Frame4 as new layer
Resize by 50%
Resize by 50%
Use your Magic Wand to select the area inside the frames
Selections > Modify > Expand by 10
Selections > Modify > Expand by 10
Paste DBA PAPER22 as new layer
Resize by 20%
Position in top Frame
Selections > Invert
Delete
Resize by 20%
Position in top Frame
Selections > Invert
Delete
KEEP SELECTED
Paste the paper and resize by 20% again
Position in lower Frame
Delete and deselect
Position in lower Frame
Delete and deselect
Layers > Merge > Merge Down
Repeat
Repeat
Duplicate, then
Image > Rotate by 10 to the right
Position slightly to the right
Image > Rotate by 10 to the right
Position slightly to the right
Duplicate again, then
Image > Mirror
Image > Mirror
Paste DBA Brad2 as new layer
Resize by 30%
Place in top Frame
Resize by 30%
Place in top Frame
Paste DBA Flowers1 as new layer
Resize by 65%
Position along bottom of lower Frame
Resize by 65%
Position along bottom of lower Frame
Paste DBA Grass4 as new layer
Resize by 30%
Position in the centre covering the bottom eyelet from the Frame
Resize by 30%
Position in the centre covering the bottom eyelet from the Frame

Paste your tube of choice or one from the kit alongside Frame
I am using DBA German Shepherd4
Resize as necessary (I resized by 60%)
I am using DBA German Shepherd4
Resize as necessary (I resized by 60%)
Paste DBA Tree2 as new layer
Layers > Arrange > Send to Bottom
Resize by 70%
Position slightly to the right
Layers > Arrange > Send to Bottom
Resize by 70%
Position slightly to the right
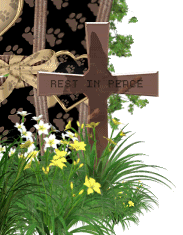
Paste DBA Rest in Peace Cross2 as new layer
Layers > Arrange > Bring to Top
Resize by 30%
Position to the right amongst and behind the flowers
Layers > Arrange > Bring to Top
Resize by 30%
Position to the right amongst and behind the flowers
Paste DBA German Shepherd9 as new layer
Resize by 30%
Position within the Brad heart in the top Frame
Resize by 30%
Position within the Brad heart in the top Frame
Activate the Brad layer and use your Magic Wand to select the area around the heart
Selections > Modify > Expand by 7
Selections > Modify > Expand by 7
Use your Eraser Tool to erase any excess
Deselect
Lower the opacity to around 50
Deselect
Lower the opacity to around 50
Paste DBA Button2 as new layer
Resize by 8%
Place over ring at top of Frame
Resize by 8%
Place over ring at top of Frame
Paste DBA Butterfly3 as new layer
Image > Rotate by 20 to the left
Resize by 10%
Position on the button to your liking
Image > Rotate by 20 to the left
Resize by 10%
Position on the button to your liking
Paste DBA Butterfly1 as new layer
Image > Rotate by 30 to the right
Resuze by 10%
Position on the Frame to your liking
Image > Rotate by 30 to the right
Resuze by 10%
Position on the Frame to your liking
Duplicate Butterflies, mirror and position them as you like
Paste DBA Ball1 as new layer
Resize by 10%
Place at Shepherd's feet
Resize by 10%
Place at Shepherd's feet
Crop and resize
Add new raster layer
Layers > Arrange > Send to Bottom
Selections > Select All
Paste Paper of choice into Selection
Deselect
Layers > Arrange > Send to Bottom
Selections > Select All
Paste Paper of choice into Selection
Deselect
Layers > New Mask Layer > From Image
Locate WSL_Mask170
OK
Layers > Merge > Merge Group
Locate WSL_Mask170
OK
Layers > Merge > Merge Group
Move Mask layer up slightly
Erase any excess from bottom
Erase any excess from bottom
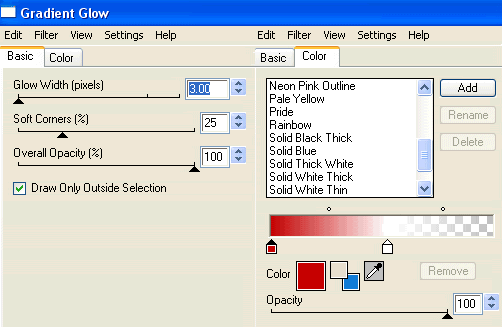
Effects > Plugins > Eye Candy 4000 > Gradient Glow with the following settings:
Lower opacity to around 35
Duplicate layer twice
Rename Mosaic1, Mosaic2 and Mosaic3
Rename Mosaic1, Mosaic2 and Mosaic3
Hide Mosaic2 and Mosaic3 and activate Mosaic1
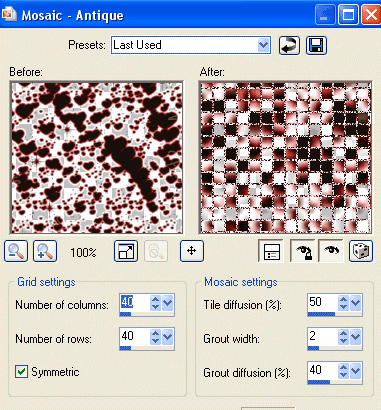
Effects > Texture Effects > Mosaic - Antique with the following settings:
Hide Mosaic1 and activate Mosaic2
Repeat the Mosaic Antique effect, changing the Grout Diffusion to 41
Repeat the Mosaic Antique effect, changing the Grout Diffusion to 41
Hide Mosaic2 and activate Mosaic3
Repeat the effect again, changing the Grout Diffusion to 42
Repeat the effect again, changing the Grout Diffusion to 42
OK, let's leave this for now - we'll come back to it when we need to animate
Activate your top layer
Select your Preset Shape Tool to Ellipse
Foreground - #000000
Background - null
Foreground - #000000
Background - null
Draw out a circle
Select your Text Tool and font of choice
I am using Cinderella ITC TT
Choose a colour from your tag for your text
I am using Cinderella ITC TT
Choose a colour from your tag for your text
Click on the curve and type out your choice of text
Position to your liking
Position to your liking
In your Layer Palette open the Vector Layer
Close off the Ellipse and convert to raster layer
Apply a drop shadow of choice
Close off the Ellipse and convert to raster layer
Apply a drop shadow of choice
Finally, add your © copyright, licence and watermark
To add your name you can select a font and colour of your choice, adding any effects and drop shadow you wish
OR
You may use an alpha as I have here (as created by Jill)
OR
You may use an alpha as I have here (as created by Jill)
Colourise Alpha to match your tag
I also used a script font over the pawprings for the name
Adding a slight Gradient Glow with the setting on Medium
Adding a slight Gradient Glow with the setting on Medium
To animate, copy merged with each respective Mosaic layer into Animation Shop
Each new layer to PASTE AFTER CURRENT FRAME
Each new layer to PASTE AFTER CURRENT FRAME
Leave Frame Properties at 10
Finally, save as a GIF and you're done!
Thank you for trying my tutorial!
::st!na::
© Tutorial written by Stina on 13th April 2009
All rights reserved
No comments:
Post a Comment