

Supplies
Scrap kit of choice - I am using the lovely "Just Another Rockstar" by Creative Intentionz which is available from Exquisite Scraps and Paradise 4 Scrappers
Tube of choice - I am using the wonderful artwork of Ismael Rac which can be purchased from My PSP Tubes
Seeing Stars Preset Shapes here
Plugin: Mura Meister Copies
Font of choice - I am using Adam Gorry-Lights
Ready? Let's begin!!
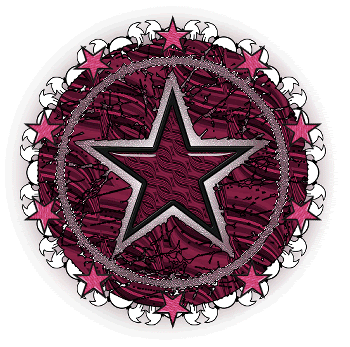
Open a new 700 x 700 blank canvas flood-filled white
Open Paper17 and minimise
Select your Preset Shape Tool to SeeingStars I
Set yout Material Properties to the following:
Foreground - #000000
Background - Paper17 (or one of choice)
Set yout Material Properties to the following:
Foreground - #000000
Background - Paper17 (or one of choice)
Stroke width - 2.00
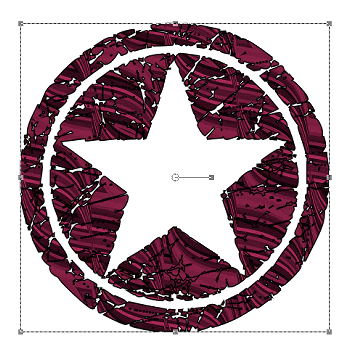
Hold your shift key down and draw out the shape
Objects > Align > Centre in Canvas
Convert to raster layer
Objects > Align > Centre in Canvas
Convert to raster layer
Duplicate layer
Rename bottom layer BLUR, then
Apply Gaussian Blur with a radius of 20.00
Apply Gaussian Blur with a radius of 20.00
Rename top layer STAR BACKGROUND, then
With your Magic Wand select the outer area
Selections > Invert
Selections > Modify > Contract by 5
With your Magic Wand select the outer area
Selections > Invert
Selections > Modify > Contract by 5
Go back to blurred layer
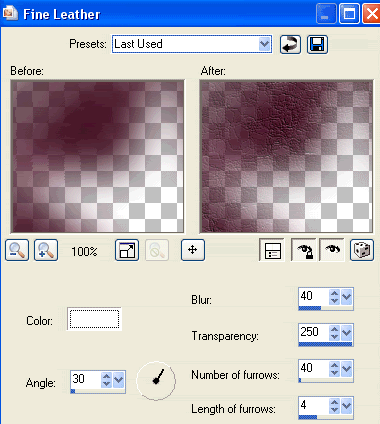
Effects > Texture Effects > Fine Leather with the following settings:
Effects > Texture Effects > Fine Leather with the following settings:
Then Effects > Edge Effects > Enhance
Selections > Invert
Apply Gaussian Blur again
Deselect
Apply Gaussian Blur again
Deselect
Paste Star5 as new layer
Position in the centre of star
Position in the centre of star
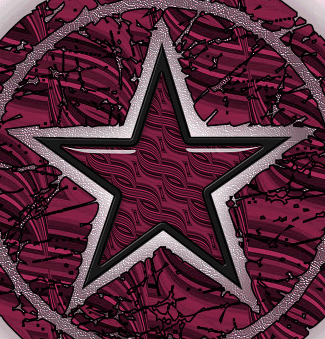
Paste Star1 as new layer in same place as first star
Resize by 25%
Resize by 25%
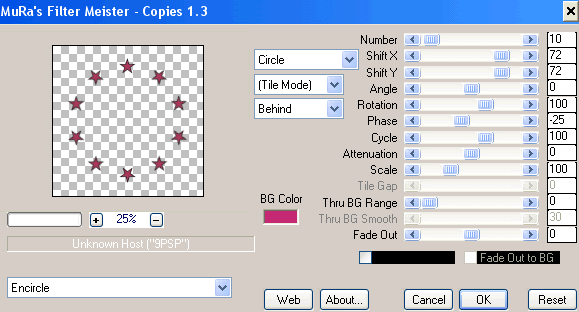
Effects > Plugins > Mura Meister > Copies with the following settings:
Duplicate layer
Adjust > Brightness & Contrast > Brightness/Contrast
Brightness - 100
Contrast - 0
Adjust > Brightness & Contrast > Brightness/Contrast
Brightness - 100
Contrast - 0
Set blend mode to Soft Light
Layers > Merge > Merge Down
Rename layer STAR FRAME
Layers > Merge > Merge Down
Rename layer STAR FRAME
Paste SkullFrame2 as new layer
Resize if needed (depending on size of your STAR BKGD)
Move to layer between BLUR and BACKGROUND STAR
Resize if needed (depending on size of your STAR BKGD)
Move to layer between BLUR and BACKGROUND STAR
With your Magic Wand select the inner ring of BACKGROUND STAR
Selections > Modify > Expand by 2
Selections > Modify > Expand by 2
Activate SKULL FRAME
Press delete then deselect
Press delete then deselect
Paste your tube as new layer
Resize if necessary
Use your Magic Wand to select the outer area of your STAR BACKGROUND
Selections > Modify > Expand by 2
Resize if necessary
Use your Magic Wand to select the outer area of your STAR BACKGROUND
Selections > Modify > Expand by 2
Activate your tube and erase any excess
Go to STAR FRAME
With your Selection Tool draw around the bottom two stars your Tube partially covers
With your Selection Tool draw around the bottom two stars your Tube partially covers
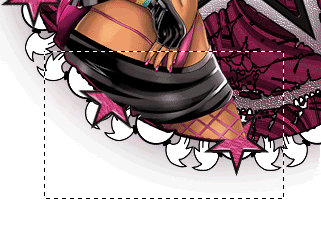
Selections > Promote Selection to Layer
Layers > Arrange > Bring to Top
Deselect
Layers > Arrange > Bring to Top
Deselect
Paste a Charm Medal of choice as new layer
Resize by 30%
Position in the centre of and beneath the upper right star
Resize by 30%
Position in the centre of and beneath the upper right star
Paste another Charm Medal of choice as new layer
Image > Rotate by 30 to the right
Resize by 30%
Position to the left of the first charm
Duplicate, then
Image > Mirror
Position on the exact opposite side of star
Image > Rotate by 30 to the right
Resize by 30%
Position to the left of the first charm
Duplicate, then
Image > Mirror
Position on the exact opposite side of star
Now let's resize tag to your liking
Select Preset Shape Tool to Ellipse
Hold Shift key down and draw out circle slightly larger than tag
Objects > Align > Centre in Canvas
Hold Shift key down and draw out circle slightly larger than tag
Objects > Align > Centre in Canvas
Select Text Tool and font of choice
I am using Adam Gorry-Lights
I am using Adam Gorry-Lights
Foreground - null
Background - colour of choice (mine is #7c1f3f)
Background - colour of choice (mine is #7c1f3f)
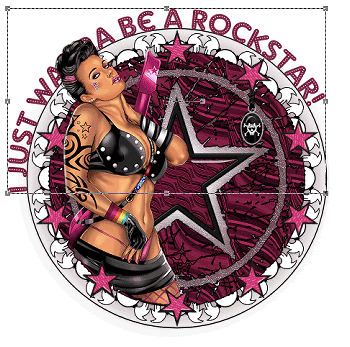
Type out your text and position to your liking
Open your Layer Palette and Vector Layer
Close off the Ellipse then convert to raster layer
Open your Layer Palette and Vector Layer
Close off the Ellipse then convert to raster layer
Still using your Text Tool select another font
I used the same one
Type out your name
Objects > Align > Horizontal Centre in Canvas
I used the same one
Type out your name
Objects > Align > Horizontal Centre in Canvas
Add a slight drop shadow:
H & V - 1
Opacity - 30
Blur - 2.00
Colour - #000000
H & V - 1
Opacity - 30
Blur - 2.00
Colour - #000000
**THIS NEXT PART IS IF YOU WISH TO ANIMATE**
Go to your Charm layers
You should have three of them
Move the first rotated one (on the left) down a layer
Rename each to Charm1, Charm2 and Charm3
You should have three of them
Move the first rotated one (on the left) down a layer
Rename each to Charm1, Charm2 and Charm3
Your layer palette should looking something like this, with Charm1 to the left and Charm3 to the right
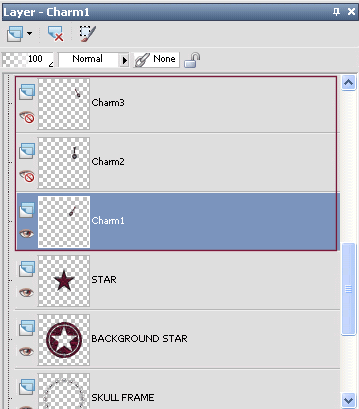
Now hide Charm2 and Charm3
Edit > Copy Merged
Edit > Copy Merged
Open Animation Shop
Edit > Past as New Animation
Edit > Past as New Animation
Back to PSP
Hide Charm1 and activate Charm2
Edit > Copy Merged
Hide Charm1 and activate Charm2
Edit > Copy Merged
In Animation Shop
Edit > Paste after Current Frame
Edit > Paste after Current Frame
Back to PSP
Hide Charm2 and activate Charm3
Edit > Copy Merged
Hide Charm2 and activate Charm3
Edit > Copy Merged
In Animation Shop
Edit > Paste after Current Frame
Edit > Paste after Current Frame
Back to PSP
Hide Charm3 and activate Charm2 again
Edit > Copy Merged
Hide Charm3 and activate Charm2 again
Edit > Copy Merged
In Animation Shop
Edit > Paste after Current Frame
Edit > Paste after Current Frame
You should know have a total of FOUR frames
Edit > Select All
Animation > Frame Properties
Animation > Frame Properties
Change properties to 50
Finally save as a GIF and you're done!
Thank you for trying my tutorial!
::st!na::
© Tutorial written by Stina on 20th April 2009
All rights reserved
No comments:
Post a Comment