
Supplies
Scrap kit of choice - I am using the delicious "Chocolate Mint" by DMK Designs which is available from Creative Scraps, Simply Beautiful Scraps and TKO Scraps
Tube of choice - I am using the artwork of Rion Vernon and PinUpToons which can be purchased from CILM
**PLEASE DO NOT USE HIS ARTWORK WITHOUT THE APPROPRIATE LICENCE**
WSL_Mask209 by Chelle available from her blog
Chocolate tube of choice - mine is here
Plugin: dbs Fluxx Gears
Fonts of choice - I am using Chowderhead and Chocolate Dulce
Ready? Let's go!!
Open a new 650 x 650 blank canvas flood-filled white
Paste Frame04 as new layer
Resize by 40%
Leave in position
Resize by 40%
Leave in position
Paste Frame02 as new layer
Resize by 44%
Layers > Arrange > Move Down
Resize by 44%
Layers > Arrange > Move Down
Select the inner area of Frame04 with your Magic Wand
Selections > Modify > Expand by 10
Selections > Modify > Expand by 10
Paste Paper10 as new layer
Resize by 35%
Layers > Arrange > Move Down
Selections > Invert
Delete and deselect
Resize by 35%
Layers > Arrange > Move Down
Selections > Invert
Delete and deselect
Paste RibbonWrap01 as new layer
Resize by 38%
Position in lower section of Frame to your liking
Select the area outside of the Frame02 with your Magic Wand
Selections > Modify > Feather by 2
Erase the excess overhanging Frame
Deselect
Resize by 38%
Position in lower section of Frame to your liking
Select the area outside of the Frame02 with your Magic Wand
Selections > Modify > Feather by 2
Erase the excess overhanging Frame
Deselect

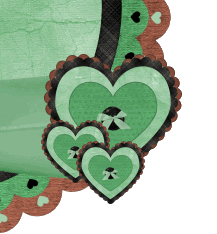
Paste PaperHeart03 as new layer
Resize by 13%
LEAVE IN POSITION
Resize by 13%
LEAVE IN POSITION
Paste PaperHeart04 as new layer
Resize by 12%
LEAVE IN POSITION
Resize by 12%
LEAVE IN POSITION
Layers > Merge > Merge Down
Position to right at the edge of the Wrap
Duplicate, then resize by 50%
Position slightly below heart to the left
Duplicate again and move slightly down and to the right
Duplicate, then resize by 50%
Position slightly below heart to the left
Duplicate again and move slightly down and to the right
Paste Paper07 as new layer
Resize by 55%
Layers > Arrange > Send to Bottom
Resize by 55%
Layers > Arrange > Send to Bottom
Layers > New Mask Layer > From Image
Locate WSL_Mask209
OK
Move Mask layer slightly so that it is centred behind Frame
Locate WSL_Mask209
OK
Move Mask layer slightly so that it is centred behind Frame
Resize
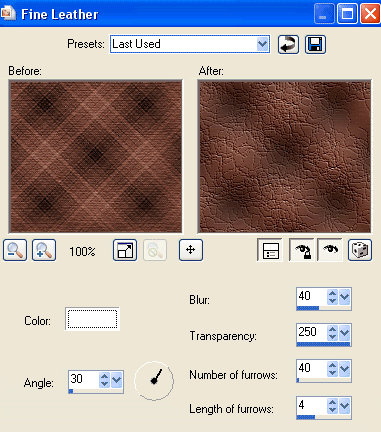
Effects > Texture Effects > Fine Leather with the following settings:
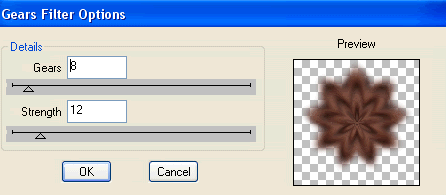
Effects > Plugins > dbs Fluxx > Gears with the following settings:
Paste tube as new layer
Resize if needed or leave as is
Position to the left inside Frame below Wrap
Set blend mode to Luminance Legacy
Lower opacity to 35
Resize if needed or leave as is
Position to the left inside Frame below Wrap
Set blend mode to Luminance Legacy
Lower opacity to 35
Select inside the Frame with your Magic Wand
Selections > Modify > Contract by 2
Selections > Modify > Feather by 2
Selections > Invert
Delete then deselect
Selections > Modify > Contract by 2
Selections > Modify > Feather by 2
Selections > Invert
Delete then deselect
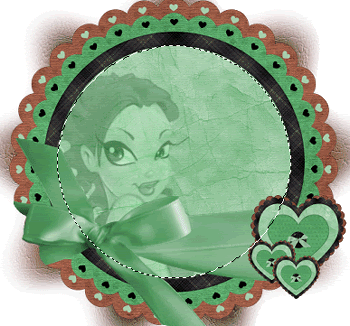
Paste your tube as new layer again
Layers > Arrange > Bring to Top
Resize slightly smaller and position to your liking
Layers > Arrange > Bring to Top
Resize slightly smaller and position to your liking
Paste some chocolates and scatter them around your tube to your liking
Now select your Preset Shape Tool to Ellipse
Foreground - #000000
Background - null
Foreground - #000000
Background - null
Hold your shift key down and draw out a circle around your tag
Objects > Align > Centre in Canvas
Move up slightly if not completely centred
Objects > Align > Centre in Canvas
Move up slightly if not completely centred
Select your Text Tool and font of choice
I am using Chowderhead
Set your Foreground and Background to two colours from your tube
I am using Chowderhead
Set your Foreground and Background to two colours from your tube
Foreground - #000000
Background - #516945
Stroke width - 1.00
Background - #516945
Stroke width - 1.00
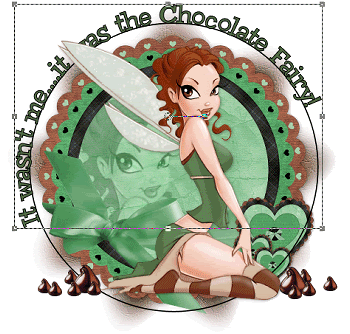
Type your choice of text
Position to your liking
Then open the layer palette and the Vector Layer
Close off the ellipse then
Convert to raster layer
Position to your liking
Then open the layer palette and the Vector Layer
Close off the ellipse then
Convert to raster layer
Select another font of choice
I am using Chocolate Dulce
I am using Chocolate Dulce
Type out your name
Objects > Align > Horizontal Centre in Canvas
Convert to raster layer
Add a drop shadow of choice
Objects > Align > Horizontal Centre in Canvas
Convert to raster layer
Add a drop shadow of choice
Finally, add your © copyright, licence and watermark, then save as a GIF or JPG and you're done!
Thanks for trying my tutorial!
::st!na::
© Tutorial written by Stina on 22nd April 2009
All rights reserved
All rights reserved
No comments:
Post a Comment