
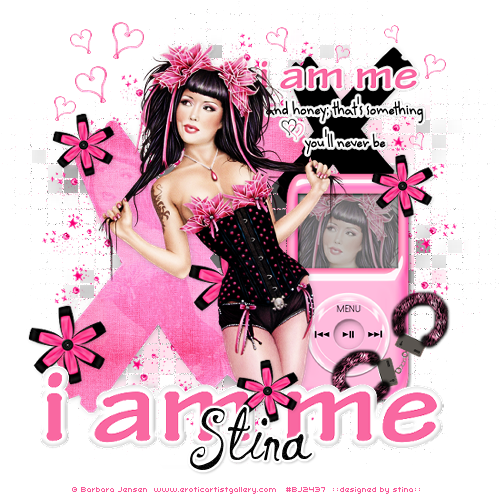
Supplies
Scrap kit of choice - I am using the exclusive collab "Teen Love" by Tammy and Missy exclusive to Scraps With Attitude
Tube of choice - I am using the gorgeous portrait of Masuimi Max by Barbara Jensen which is available and can be purchased through her store
WSL_Mask5 by Chelle available on her blog
Font of choice - I am using IngridDarling
Plugin: Mura Meister Copies
Plugin: Eye Candy 4000 Gradient Glow
Ok, let's begin!
Open a new 700 x 700 blank canvas flood-filled white
Open Temmay's Paper2 and resize 350 x 350
Minimise
Minimise
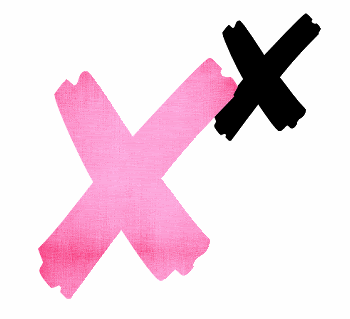
Select your Preset Shape Tool and find the X
In your Materials Palette find the paper you just minimised
Foreground - null
Background - Paper2 or one of choice
In your Materials Palette find the paper you just minimised
Foreground - null
Background - Paper2 or one of choice
Draw out a large X
Objects > Align > Centre in Canvas
Convert to raster layer
Objects > Align > Centre in Canvas
Convert to raster layer
Change the colour in your Palette from the Paper to #000000
Now draw out a smaller X to the upper right
Now draw out a smaller X to the upper right
You should now have something like this:
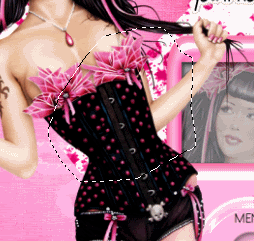
Paste your tube as new layer
Resize if needed and place in position
Duplicate and set blend mode to Overlay
Then lower opacity to 55
Resize if needed and place in position
Duplicate and set blend mode to Overlay
Then lower opacity to 55
Layers > Merge > Merge Down
Paste MP3Player1 as new layer
Resize by 30%
Select the grey area of the player's screen with your Magic Wand (ensure your Tolerance is set about 50)
Duplicate your tube layer and position to your liking on the screen
Selections > Invert
Delete then deselect
Resize by 30%
Select the grey area of the player's screen with your Magic Wand (ensure your Tolerance is set about 50)
Duplicate your tube layer and position to your liking on the screen
Selections > Invert
Delete then deselect
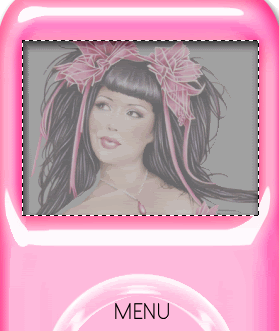
Layers > Merge > Merge Down
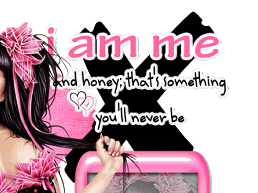
Paste Tammy's StickerWordArt3 as new layer
Resize by 18%
Position in upper right
Resize by 18%
Position in upper right
Paste FuzzyHandCuffs1 as new layer
Resize by 25%
Image > Mirror
Position to the lower left
Resize by 25%
Image > Mirror
Position to the lower left
Paste Tammy's StarDust2 as new layer
DO NOT MOVE!!
Resize by 20%
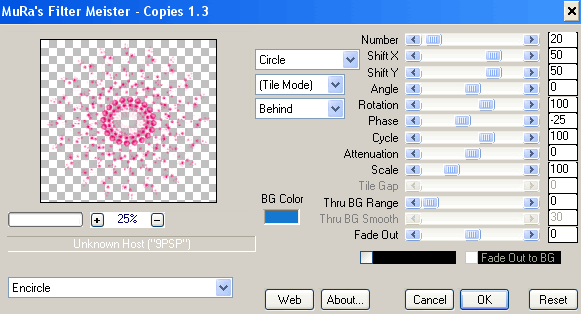
Effects > Plugins > Mura Meister > Copies with the following settings:
Layers > Arrange > Send to Bottom
Resize by 90%
Resize by 90%
Select your Freehand Tool and make a selection around the centre where the stars are showing from the bottom layer
Delete then deselect
Paste HeartRope1 as new layer
Image > Rotate by 20 to the left
Resize by 5%
Position in upper left above X
Duplicate then Image > Mirror
Position alongside first Heart
Image > Rotate by 20 to the left
Resize by 5%
Position in upper left above X
Duplicate then Image > Mirror
Position alongside first Heart
Duplicate again and Image > Mirror
Resize by 70%
Position slightly to the left of heart facing opposite direction
Duplicate then Image > Mirror
Position to the left of other heart
Resize by 70%
Position slightly to the left of heart facing opposite direction
Duplicate then Image > Mirror
Position to the left of other heart
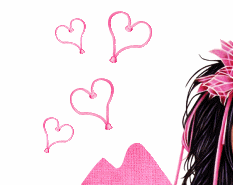
Duplicate and Image > Mirror a few more times
Position to your liking
Position to your liking
Hide ALL layers except the Hearts
Layers > Merge > Merge Visible
Unhide all layers
Layers > Merge > Merge Visible
Unhide all layers
Activate top layer
Paste RibbonButtonFlower7 (black with pink button) as new layer
Resize by 8%
Position somewhere along the X
Resize by 8%
Position somewhere along the X
Paste RibbonButtonFlower1 (pink with blue button) as new layer
With your Magic Wand (on same settings as above) select the blue button area
You may have to click several times till ALL the area is selected
Selections > Modify > Expand by 1
With your Magic Wand (on same settings as above) select the blue button area
You may have to click several times till ALL the area is selected
Selections > Modify > Expand by 1
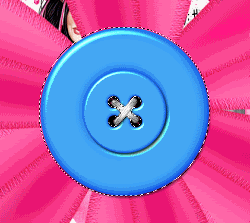
Go to Adjust > Hue & Saturation > Colourise and set both Hue and Saturation to 0
KEEP SELECTED!!
Layers > Promote Selection to Layer
Set blend mode to Multiply
Duplicate layer
Set blend mode to Multiply again
Layers > Merge > Merge Down
Duplicate layer again
Set blend mode to Multiply one more time
Layers > Merge > Merge Down
Then Layers > Merge > Merge Down once more
Deselect
Set blend mode to Multiply
Duplicate layer
Set blend mode to Multiply again
Layers > Merge > Merge Down
Duplicate layer again
Set blend mode to Multiply one more time
Layers > Merge > Merge Down
Then Layers > Merge > Merge Down once more
Deselect
Your button should now be black
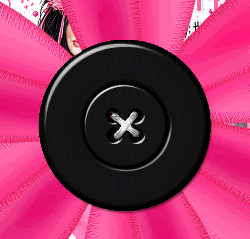
Now resize by 6%
Position over the Pink Button Flower
Layers > Merge > Merge Down, then
Layers > Arrange > Move Down
Flower should now be the layer below your tube
Position over the Pink Button Flower
Layers > Merge > Merge Down, then
Layers > Arrange > Move Down
Flower should now be the layer below your tube
Duplicate Flower a few times and position to your liking
Paste Tammy's StickerWordArt3 as new layer again
Resize by 45%
Position along bottom
Resize by 45%
Position along bottom
With your Selection Tool draw a rectangle around the words I AM ME
Selections > Invert
Delete then deselect
Selections > Invert
Delete then deselect
Add a drop shadow to your elements then resize tag
Activate your Background layer
Paste Paper5 as new layer
Layers > New Mask Layer > From Image
Locate WSL_Mask5 as new layer
Select your Pick Tool and activate the mask layer
Use the nodes to pull the mask out a little
Layers > Merge > Merge Group
Paste Paper5 as new layer
Layers > New Mask Layer > From Image
Locate WSL_Mask5 as new layer
Select your Pick Tool and activate the mask layer
Use the nodes to pull the mask out a little
Layers > Merge > Merge Group
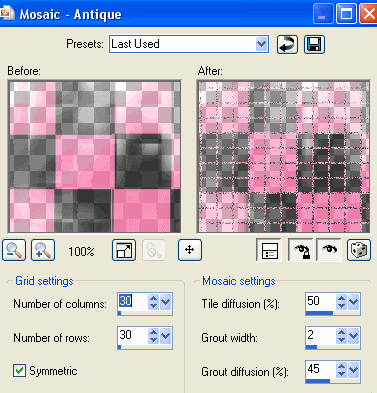
Effects > Texture Effects > Antique Mosaic with the following settings:
If you wish to animate, duplicate Mask layer twice and apply the Mosaic effect to each - adjusting the Grout Diffusion by 1 each time
Copy Merged with each Mask layer into Animation Shop
Copy Merged with each Mask layer into Animation Shop
Now Select your Text Tool and font of choice
I am using IngridDarling
Set your Material Palette:
Foreground - null
Background - #000000
I am using IngridDarling
Set your Material Palette:
Foreground - null
Background - #000000
Type out your name
Objects > Align > Horizontal Centre in Canvas
Convert to raster layer
Add some noise then apply a white Gradient glow
Add a drop shadow of choice
Objects > Align > Horizontal Centre in Canvas
Convert to raster layer
Add some noise then apply a white Gradient glow
Add a drop shadow of choice
Finally, add your © copyright, licence and watermark then save as a GIF or JPG and you're done!
Thank you for trying my tutorial!
::st!na::
© Tutorial written by Stina on 18th April 2009
All rights reserved
No comments:
Post a Comment