
Supplies
Scrap kit of choice - I am using the lovely "Silly Wabbit" by Oopsie Daisy which is available from Exquisite Scraps
Tubes of choice - I am using the gorgeous artwork of Suzanne Woolcott which can be purchased from her store
**PLEASE DO NOT USE HER ARTWORK WITHOUT THE APPROPRIATE LICENCE**
Preset Shape of choice - I am using a Flower shape
Font of choice - I am using 2Peas Typo
~ Step 1 ~
Open a new 700 x 700 blank canvas flood-filled white
Paste Frame2 as new layer
Resize by 20%
Position to the right
Resize by 20%
Position to the right
Select inside each of the Frames using your Magic Wand
(don't forget to click on the shadow part as well to select the whole area)
Selections / Modify / Expand by 10
(don't forget to click on the shadow part as well to select the whole area)
Selections / Modify / Expand by 10
Add a new raster layer
Paste PP8 into Selection
Deselect
Layers / Arrange / Move Down
Paste PP8 into Selection
Deselect
Layers / Arrange / Move Down
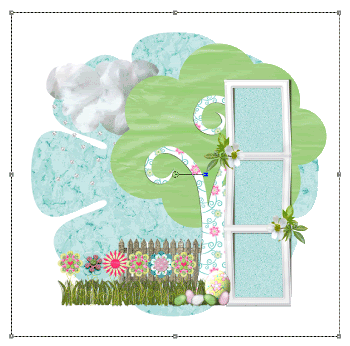
~ Step 2 ~
Paste Tree as new layer
Resize by 15%
Layers / Arrange / Move Down
Repeat
Position to the right beneath Frame
Resize by 15%
Layers / Arrange / Move Down
Repeat
Position to the right beneath Frame
Paste Grass Fence Border as new layer
Resize by 15%
Position along bottom
Resize by 15%
Position along bottom
Paste Diamonds From Heaven as new layer
Resize by 10%
Position partially tucked behind tree
Resize by 10%
Position partially tucked behind tree
Paste Wooden Fence as new layer
Resize by 8%
Position behind Tree
Resize by 8%
Position behind Tree
Paste Yellow Gel Swirl as new layer
Resize by 5%
Duplicate then Layers / Merge / Merge Down
Position in the grass
Duplicate several times and space along the fenceline
Resize by 5%
Duplicate then Layers / Merge / Merge Down
Position in the grass
Duplicate several times and space along the fenceline
Paste various flowers
Resize by 7 - 10% each
Position on stems/swirls
Resize by 7 - 10% each
Position on stems/swirls
Paste a bird
Resize by around 5%
Place on fence
Resize by around 5%
Place on fence
Paste some Easter Eggs
Resize as necessary
Scatter in position
Resize as necessary
Scatter in position
Then paste Egg2 as new layer
Resize by 17% TWICE
Duplicate and set blend mode to Soft Light
Layers / Merge / Merge Down
Resize by 17% TWICE
Duplicate and set blend mode to Soft Light
Layers / Merge / Merge Down
Effects / 3D Effects / Inner Bevel with the following settings:
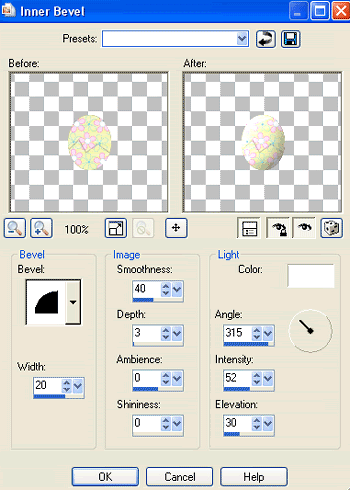
Then duplicate and blend mode to Multiply
Layers / Merge / Merge Down
Layers / Merge / Merge Down
Image / Resize
~ Step 3 ~
Open PP8 and minimise
Select your Preset Shape Tool on a Flower or any round shape of your choice
Draw out your shape
Objects / Align / Centre in Canvas
Convert to raster layer
Draw out your shape
Objects / Align / Centre in Canvas
Convert to raster layer
Effects / Texture Effects / Mosaic - Antique with the following settings:

Lower opacity to around 60
Still on this layer
Select your Selection Tool
Then in your Tool Options Palette click on Layer Opaque which will make a selection around that layer
Now go to Image / Crop to Selection
Select your Selection Tool
Then in your Tool Options Palette click on Layer Opaque which will make a selection around that layer
Now go to Image / Crop to Selection
Now all that is left is to decorate your creation
Add some tubes and elements into the frames
Don't forget to select inside the frames
Selections / Modify / Expand by 5
Selections / Invert
Delete and deselect
Don't forget to select inside the frames
Selections / Modify / Expand by 5
Selections / Invert
Delete and deselect
Activate your top layer
Paste your main tube and resize as necessary
Apply a drop shadow of choice
Paste your main tube and resize as necessary
Apply a drop shadow of choice
Select your Text Tool and font of choice
I am using 2Pease Typo
Choose a colour to match your tag
I am using 2Pease Typo
Choose a colour to match your tag
In your Materials Palette:
Foreground - #FFFFFF
Background - #71a852 (or colour of your choice)
Foreground - #FFFFFF
Background - #71a852 (or colour of your choice)
Stroke width - 1.5
Type out your name
Objects / Align / Horiztonal Centre in Canvas
Convert to raster layer
Objects / Align / Horiztonal Centre in Canvas
Convert to raster layer
Apply a drop shadow:
H & V - 1.00
Opacity - 30
Blur - 5.00
Colour - #004000
H & V - 1.00
Opacity - 30
Blur - 5.00
Colour - #004000
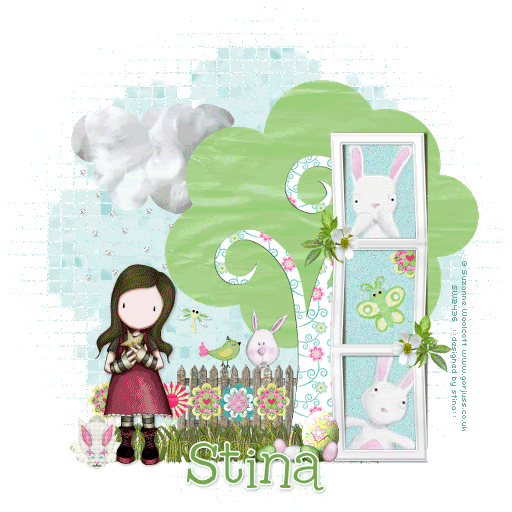
Finally add your © copyright, licence and watermark, then save as a GIF or JPG and you're done!
Thank you for trying my tutorial!
::st!na::
© Tutorial written by Stina on 4th April 2009
All rights reserved
No comments:
Post a Comment