

Supplies
Scrap kit of choice - I am using "Wishing Dreams" by ChaDesigns which is available at Creative Scraps and Cotton Candy Kreations
Tube of choice - I am using the gorgeous artwork of Caron Vinson which can be purchased from CILM
**PLEASE DO NOT USE HER ARTWORK WITHOUT THE APPROPRIATE LICENCE**
WSL_Mask84 by Chelle
Font of choice - I am using Cheri
Plugin: Xero Improver and Xero Radiance
Plugin: Penta.com Jeans (optional)
Plugin: Eye Candy 4000 Gradient Glow (optional)
My Supplies here
~ Step 1 ~
Open a new 600 x 600 blank canvas flood-filled white
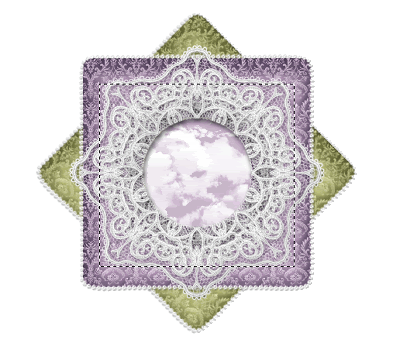
Paste Frame1 as new layer
Resize by 30%
Image / Rotate by 45 to the left (or right *g*)
Paste Frame2 as new layer
Resize by 30%
Resize by 30%
Add new raster layer
Layers / Arrange / Move Down
Layers / Arrange / Move Down
Grab your Selection Tool and draw out a rectangle anywhere inside the frame
Open Paper9
Edit / Copy
Edit / Copy
Activate new layer
Edit / Paste into Selection
Deselect
Edit / Paste into Selection
Deselect
Lower opacity to 65
~ Step 2 ~
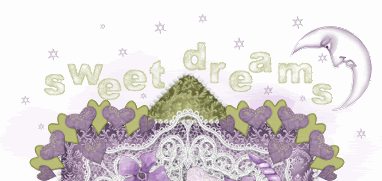
Paste Doodle2 as new layer
Resize by 50%
Position along the bottom of frame
Resize by 50%
Position along the bottom of frame
Paste Leaves1 as new layer
Image / Rotate by 10 to the right
Resize by 30%
Position to the right
Duplicate then Image / Mirror
Place the one on the left beneath the Doodle layer
Image / Rotate by 10 to the right
Resize by 30%
Position to the right
Duplicate then Image / Mirror
Place the one on the left beneath the Doodle layer

Paste Heart as new layer
Image / Rotate by 25 to the left
Resize by 15%
Position in upper left corner
Duplicate then Image / Mirror
Paste Moon as new layer
Resize by 15%
Position in the upper right
Resize by 15%
Position in the upper right
Paste Cloud as new layer
Resize by 40%
Layers / Arrange / Send to Bottom
Position near the top
Resize by 40%
Layers / Arrange / Send to Bottom
Position near the top
Activate top layer
Open the Alpha sheet
Using your Selection or Freehand Tool draw around each letter
Paste each one as new layer
Resize by 20%
Using your Selection or Freehand Tool draw around each letter
Paste each one as new layer
Resize by 20%
Position along the top at varying lengths
Once satisfied hide all layers but the Letters then
Layers / Merge / Merge Visible
Layers / Merge / Merge Visible
Add a new raster layer
Select
Select a Star Brush and a colour from your scrap as your Foreground
Paste the brush on your layer by clicking your mouse - Left click for foreground; Right click for background
Paste the brush on your layer by clicking your mouse - Left click for foreground; Right click for background
Paste your tube as new layer
Resize as necessary and place in centre
Use an Eraser with a soft edge to softly erase the bottom of your tube
Resize as necessary and place in centre
Use an Eraser with a soft edge to softly erase the bottom of your tube
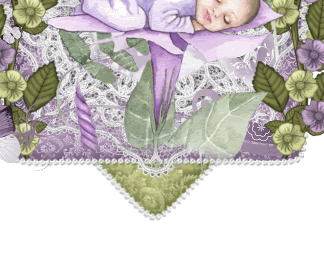
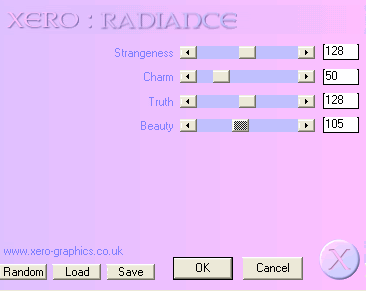
Effects / Plugins / Xero / Improver with default settings
Effects / Plugins / Xero / Radiance with the following settings:
Paste Flower5 as new layer
Resize by 25%
Position at the bottom of the frame layer over the erased edge of the tube
Crop and Resize
~ Step 3 ~
Activate Background layer
Paste Paper9 as new layer
Layers / New Mask Layer / From Image
Locate WSL_Mask84
OK
Layers / New Mask Layer / From Image
Locate WSL_Mask84
OK
Layers / Merge / Merge Group
LOwer opacity to 55
LOwer opacity to 55
Select your Text Tool, font and colour
Type your name
Objects / Align / Horizontal Centre in Canvas
Convert to Raster layer
Apply an effect of your choice (I used Penta.com/Jeans)
Apply a Gradient Glo, then
Add a drop shadow:
H & V - 1
Opacity - 30
Blur - 3.00
Colour - #342335
Type your name
Objects / Align / Horizontal Centre in Canvas
Convert to Raster layer
Apply an effect of your choice (I used Penta.com/Jeans)
Apply a Gradient Glo, then
Add a drop shadow:
H & V - 1
Opacity - 30
Blur - 3.00
Colour - #342335
Finally, add your © copyright, licence and watermark
Save as a GIF and you're done!
Thank you for trying my tutorial
::st!na::
© Tutorial written by Stina on 14th March 2009
All rights reserved
No comments:
Post a Comment