
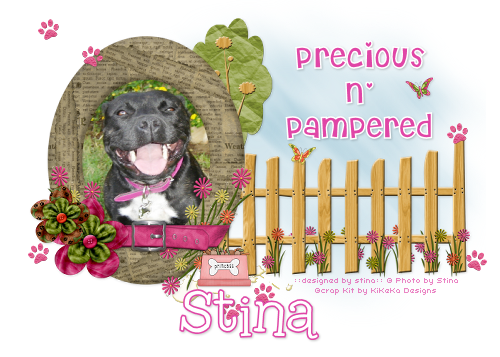
Supplies
Scrap kit of choice - I am using the delightful "Precious Pup" kit by KiKeKa Designs aka Crafted by Gina which is available from Paradise 4 Scrappers
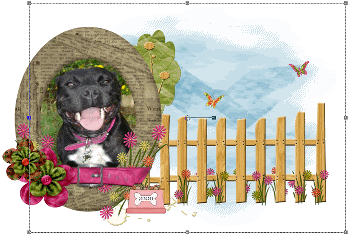
Tube or image of choice - I am using one of my own of my own "precious" pup
Becky_Mask023
Fonts of choice - I am using Cheri and 2Peas Typo
~ Step 1 ~
Open a new 700 x 500 blank canvas flood-filled white
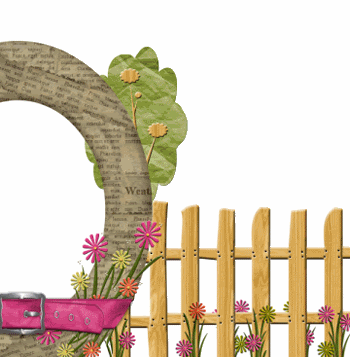
Paste Frame6 as new layer
Resize by 60%
Position slightly to the left
Resize by 60%
Position slightly to the left
Paste Fence as new layer
Resize by 50%
Position to the right of Frame
Layers / Arrange / Move Down
Resize by 50%
Position to the right of Frame
Layers / Arrange / Move Down
Paste Tree1 as new layer
Resize by 40%
Position behind Frame so that it protrudes slightly
Resize by 40%
Position behind Frame so that it protrudes slightly
Paste Puddle1 as new layer
Resize by 30%
Position below fence to the right of the Frame
Resize by 30%
Position below fence to the right of the Frame
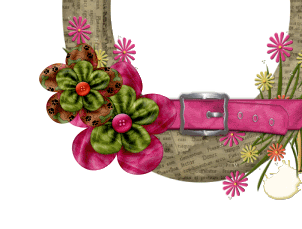
Paste Flower1 as new layer
Resize by 30%
Position on the lower left corner of Frame
Resize by 30%
Position on the lower left corner of Frame
Paste Flower2 as new layer
Resize by 22%
Position alongside first flower
Resize by 22%
Position alongside first flower
Paste Butterfly1 as new layer
Resize by 10%
Position above Fence
Resize by 10%
Position above Fence
Paste Butterfly3 as new layer
Resize by 10%
Image / Mirror
Position above Fence also
Resize by 10%
Image / Mirror
Position above Fence also
Add any other elements you like to make it your own
~ Step 2 ~
Now, let's add our photo, image or tube of choice
If you are using a tube, you should add a nice paper to the Frame for a background
So first choose an image or tube to use
Since I am using one of my own photos I will refer to this as "image"
Since I am using one of my own photos I will refer to this as "image"
Now, select the area inside the Frame with your Magic Wand
Selections / Modify / Expand by 10
Paste your image as new layer
Resize as necessary to fit nicely within Frame
Selections / Invert
Delete and deselect
Selections / Modify / Expand by 10
Paste your image as new layer
Resize as necessary to fit nicely within Frame
Selections / Invert
Delete and deselect
Paste Paper9 as new layer
Layers / Arrange / Send to Bottom
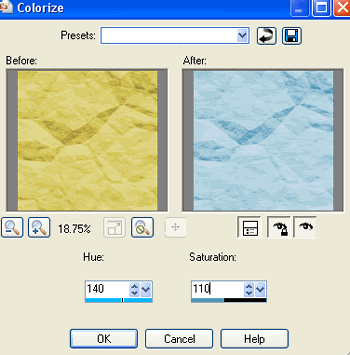
Adjust / Hue & Saturation / Colourise with the following settings:
Layers / Arrange / Send to Bottom
Adjust / Hue & Saturation / Colourise with the following settings:
Then Layers / New Mask Layers / From Image
Locate Becky_Mask023
OK
Image / Mirror
Locate Becky_Mask023
OK
Image / Mirror
Select your Pick Tool and use the Nodes to adjust the size and placing of the mask
Then Adjust / Blur / Motion Blur
Angle - 140
Strength - 100
Repeat
Lower opacity to around 70
Angle - 140
Strength - 100
Repeat
Lower opacity to around 70
Activate top layer
Paste Pawprint2 as new layer
Image / Rotate by 20 to the left
Resize by 10%
Duplicate several times, Mirror and position to your liking around tag
Paste Pawprint2 as new layer
Image / Rotate by 20 to the left
Resize by 10%
Duplicate several times, Mirror and position to your liking around tag
Crop and resize
~ Step 3 ~
Choose a colour from your scrap and set your Material Palette with these settings:
Foreground - #FFFFFF
Background - #e046a6 (or colour from your scrap)
Foreground - #FFFFFF
Background - #e046a6 (or colour from your scrap)
Select your Text Tool and font of choice
I am using Cheri
Stroke width - 1.5
Size - 30
Align centre
I am using Cheri
Stroke width - 1.5
Size - 30
Align centre
Type in your text
Place in position
Convert to raster layer
Place in position
Convert to raster layer
Apply a drop shadow:
H & V - 1
Opacity - 20
Blur - 3.00
Colour - #000000
H & V - 1
Opacity - 20
Blur - 3.00
Colour - #000000
Add your name in same or other font
Finally add your © copyright, licence and watermark
Save as GIF or JPG and you're done!
Thanks for trying my tutorial
::st!na::
© Tutorial written by Stina on 30th March 2009
All rights reserved
No comments:
Post a Comment