
Supplies
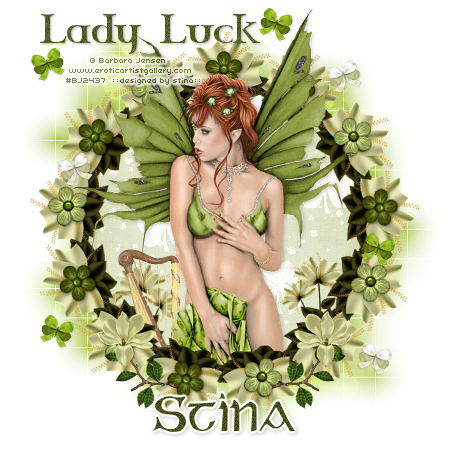
"Lucky" by Bel Vidotti as part of the Feelin' Lucky Blog Train sponsored by Scrappin' Bratz
Tube of choice - I am using the artwork of Barbara Jensen which can be purchased from her website
**PLEASE DO NOT USE HER ARTWORK WITHOUT THE APPROPRIATE LICENCE**
WSL_Mask84 by Chelle (supplied)
Fonts of choice - I am using Celtic Garamond and Celtic Gaelige (supplied)
My Supplies here
~ Step 1 ~
Open a new 600 x 600 blank canvas flood-filled white
Paste Frame05 as new layer
Leave in centre
Leave in centre
Add a new raster layer
Layers / Arrange / Move Down
Layers / Arrange / Move Down
Open Paper03
Edit Copy
Edit Copy
Click inside Frame with your Magic Wand
Selections / Modify / Expand by 10
Paste Paper03 into Selections
Deselect
Selections / Modify / Expand by 10
Paste Paper03 into Selections
Deselect
Adjust / Hue & Saturation / Colourise with the following settings:
Now I added the lighter flower to every second flower on the frame
I did so by pasting the flower and resizing it by 12% each time
I pasted a new layer and resized for each flower rather than duplicating the existing one as it would distort
Then I rotated each flower to match the flower it would replace
It's up to you if you wish to play with this step to your liking
Then Layers / Merge / Merge Down
~ Step 2 ~
Paste your tube as new layer
Place in position and resize as necessary
Place in position and resize as necessary
Click inside the Frame again with your Magic Wand
Selections / Invert
Selections / Modify / Contract by 2
Selections / Modify / Feather by 2
Now use your Eraser Tool to carefully erase the bottom of the tube
Deselect
Selections / Invert
Selections / Modify / Contract by 2
Selections / Modify / Feather by 2
Now use your Eraser Tool to carefully erase the bottom of the tube
Deselect
Apply a soft drop shadow
Paste Flower05 as new layer
Resize by 30%
Position to the left
Resize by 30%
Position to the left
Layers / Arrange / Move Down
Repeat
Repeat
Flower should now be UNDER the Frame
Duplicate layer
Image / Mirror
Image / Mirror
Open Harp and paste as new layer
Resize by 40%
Position above and over flower to the left
Resize by 40%
Position above and over flower to the left
Paste Leaves as new layer
Resize by 30%
Paste Flower04 as new layer
Resize by 30%
Resize by 30%
Paste Flower04 as new layer
Resize by 30%
Position flower over leaves
Layers / Merge / Merge Down
Layers / Merge / Merge Down
Resize by 85%
Position to the lower right on the Frame
Duplicate then
Image / Mirror
Position to the lower right on the Frame
Duplicate then
Image / Mirror
You should now have something like this:
Paste Butterfly02 as new layer
Image / Rotate by 20 to the right
Resize by 12%
Position to the right on the Frame
Image / Rotate by 20 to the right
Resize by 12%
Position to the right on the Frame
Paste Butterfly03 as new layer
Image / Rotate by 20 to the left
Resize by 12%
Position to the left on the Frame
Image / Rotate by 20 to the left
Resize by 12%
Position to the left on the Frame
Duplicate Butterflies and place to your liking
Resize image
~ Step 3 ~
Activate Background
Add a new raster layer
Selections / Select All
Paste Paper02 into Selection
Deselect
Selections / Select All
Paste Paper02 into Selection
Deselect
Layers / New Mask Layer / From Image
Locate WSL_Mask84
OK
Locate WSL_Mask84
OK
Lower opacity to around 75
Choose a colour from your tube - I chose #464d15
Set it as your background in the Materials Palette
Set it as your background in the Materials Palette
Select your Text Tool and choose your font
I am using Celtic Garamond
Type out the words "Lady Luck" or anything of your choosing
Add some Noise
Apply a slight drop shadow
I am using Celtic Garamond
Type out the words "Lady Luck" or anything of your choosing
Add some Noise
Apply a slight drop shadow
Choose another font (if you wish)
I am using Celtic Gaelige
Same colour for background/text
I am using Celtic Gaelige
Same colour for background/text
Type your name
Add some Noise
Effects / Plugins / Eye Candy 4000 / Gradient Glow with the following settings:
Add some Noise
Effects / Plugins / Eye Candy 4000 / Gradient Glow with the following settings:
Apply a drop shadow:
H & V - 1
Opacity - 30
Blur - 5.00
Colour - #464d15
H & V - 1
Opacity - 30
Blur - 5.00
Colour - #464d15
Finally, add your © copyright, licence and watermark
Then save as a GIF or JPG and you're done!
Then save as a GIF or JPG and you're done!
Thank you for trying my tutorial
::st!na::
© Tutorial written by 11th March 2009
All rights reserved
No comments:
Post a Comment