

Supplies
Scrap kit of choice - I am using the lovely "Springy" by Oopsie Daisy available exclusively at Exquisite Scraps
Tubes of choice - I am using the delightful artwork of Rion Vernon and PinUpToons which can be purchased from CILM
**PLEASE DO NOT USE HIS ARTWORK WITHOUT THE APPROPRIATE LICENCE**
Fonts of choice - I used 2Peas Chatter and 2Peas Mister Giggles (pay fonts)
Plugin: Eye Candy 4000 Gradient Glow
~ Step 1 ~
Open a blank 650 x 600 canvas flood-filled white
Grab your Selection Tool and choose Circle from the menu
Align your pointer in the middle of the screen; left click your mouse and drag to draw out your circle
Add a new raster layer
Align your pointer in the middle of the screen; left click your mouse and drag to draw out your circle
Add a new raster layer
Open PP1 and Edit / Copy
Activate your working canvas then Edit / Paste into Selection
Deselect
Duplicate it and Rename them as Circle1 and Circle2
As we will be using the top one (Circle2) turn off the visibility of Circle1
We will come back to it later on
Activate your working canvas then Edit / Paste into Selection
Deselect
Duplicate it and Rename them as Circle1 and Circle2
As we will be using the top one (Circle2) turn off the visibility of Circle1
We will come back to it later on
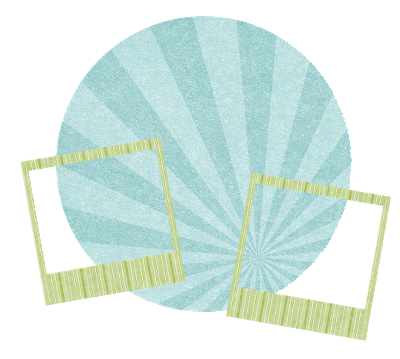
Paste Frame as new layer
Resize by 10%
Image / Rotate by 10 to the left
Position to the lower left of your circle
Duplicate then Image / Mirror
Position second frame opposite to your liking
Rename them Frame1 and Frame2
Resize by 10%
Image / Rotate by 10 to the left
Position to the lower left of your circle
Duplicate then Image / Mirror
Position second frame opposite to your liking
Rename them Frame1 and Frame2
Click inside Frame1
Selections / Modify / Expand by 5
Add new raster layer
Selections / Modify / Expand by 5
Add new raster layer
Open PP12
Edit / Copy
Then back to your working canvas
Edit / Paste into Selection
Deselect
Edit / Copy
Then back to your working canvas
Edit / Paste into Selection
Deselect
Repeat step for Frame2

~ Step 2 ~
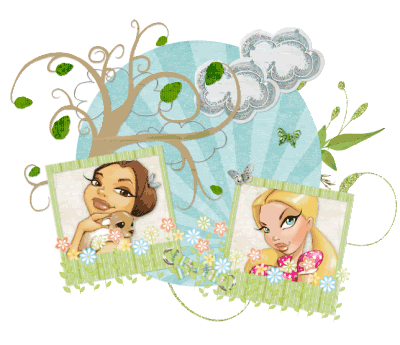
Paste Ribbon3 as new layer
Image / Rotate by 25 to the right
Resize by 8%
Position between the two frames as to join them
Image / Rotate by 25 to the right
Resize by 8%
Position between the two frames as to join them
Paste Flourish as new layer
Resize by 50%
Position slightly to the right, then
Layers / Arrange / Send to Bottom
Resize by 50%
Position slightly to the right, then
Layers / Arrange / Send to Bottom
Activate your Circle layer
Paste Tree as new layer and resize by 25%
Position slightly to the left and so the base of the tree is hidden by Frame1
Paste Tree as new layer and resize by 25%
Position slightly to the left and so the base of the tree is hidden by Frame1
Paste Cloud as new layer
Resize by 10%
Position to the upper right
Layers / Arrange / Move Down
Duplicate and move slightly to the left and down
Resize by 10%
Position to the upper right
Layers / Arrange / Move Down
Duplicate and move slightly to the left and down
Paste Wire Clouds as new layer
Resize by 12%
Position to your liking
Resize by 12%
Position to your liking

~ Step 3 ~
Paste some flowers to the corners and bottom of the Frames
(these are not included with this kit but found elsewhere with other scraps or clipart)
Resize as necessary
Position to your liking
(these are not included with this kit but found elsewhere with other scraps or clipart)
Resize as necessary
Position to your liking

Paste Butterfly3 as new layer
Resize by 10%
Position on corner of Frame2 or to your liking
Resize by 10%
Position on corner of Frame2 or to your liking
Paste Butterfly2 as new layer
Resize by 2% then again by 85%
Image / Rotate by 10 to the right
Position to your liking
Resize by 2% then again by 85%
Image / Rotate by 10 to the right
Position to your liking
OK, time to add our tubes
Activate Frame1
Click inside the frame using your Magic Wand
Selections / Modify / Expand by 5
Paste a tube of choice as new layer
Layers / Arrange / Move Down
Position beneath frame to your liking
Once satisfied, Selections / Invert
Delete and deselect
Click inside the frame using your Magic Wand
Selections / Modify / Expand by 5
Paste a tube of choice as new layer
Layers / Arrange / Move Down
Position beneath frame to your liking
Once satisfied, Selections / Invert
Delete and deselect
Activate Frame2 and repeat steps with another tube of choice
Add a drop shadow to your tubes:
H & V – 1
Opacity – 30
Blur – 8.00
Colour - #000000
H & V – 1
Opacity – 30
Blur – 8.00
Colour - #000000
To your Frames, Tree, Clouds and butterflies add the following drop shadow:
H & V – 1
Opacity – 20
Blur – 2.00
Colour - #000000
H & V – 1
Opacity – 20
Blur – 2.00
Colour - #000000
Now you can add another tube to the centerpiece of the tag if you wish
Or you can leave it as is
It's entirely up to you as it is your creation
Or you can leave it as is
It's entirely up to you as it is your creation
So now it is time to crop and resize your tag
I resized mine to 500 x 460
I resized mine to 500 x 460
~ Step 4 ~
Activate your Circle1 layer (remember we duplicated this at the beginning)
Layers / Arrange / Move Down
Activate your Pick Tool which will enable the Nodes around your layer
Now position so it is completely central
Keep the Pick Tool enabled so you can see the size of the effect applied with each step
Layers / Arrange / Move Down
Activate your Pick Tool which will enable the Nodes around your layer
Now position so it is completely central
Keep the Pick Tool enabled so you can see the size of the effect applied with each step
Go to Adjust / Blur / Gaussian Blur with a Radius of 25.00
Effects / Texture Effects / Mosaic - Antique with the following settings:
Effects / Texture Effects / Mosaic - Antique with the following settings:
Duplicate then Layers / Merge / Merge Down
You can turn off your Pick Tool now
You can turn off your Pick Tool now
Activate your top layer
Select your Preset Shape Tool on Ellipse
Foreground - #000000
Background – null
Select your Preset Shape Tool on Ellipse
Foreground - #000000
Background – null
Draw out a circle around the outside of your tag to your liking
Select your Text Tool with a font of your choice (I am using 2Peas Chatter)
Foreground – null
Background – colour of choice
(to match the kit or your tube)
Foreground – null
Background – colour of choice
(to match the kit or your tube)
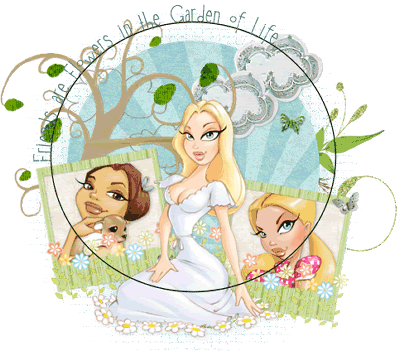
Set your mouse over the curve of the Ellipse and type out your text
Position to your liking using the rotator node in the centre of the Vector
Then open your Layer Palette and locate the Vector Layer
Open by clicking the +
Turn off the visibility of the Ellipse then Convert to raster layer
Position to your liking using the rotator node in the centre of the Vector
Then open your Layer Palette and locate the Vector Layer
Open by clicking the +
Turn off the visibility of the Ellipse then Convert to raster layer
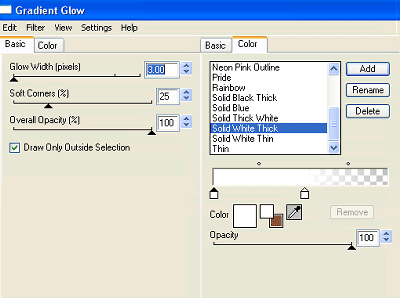
Effects / Plugins / Eye Candy 4000 / Gradient Glow with the following settings:
Apply a drop shadow:
H & V – 1
Opacity – 40
Blur – 3.00
Colour - #2c4848
Select another font of choice (or use the same if you wish) and type out your name
Objects / Align / Horizontal Centre in Canvas
Convert to raster layer
Objects / Align / Horizontal Centre in Canvas
Convert to raster layer
Apply the same Gradient Glow as above, then
Add a drop shadow:
H & V – 1
Opacity – 30
Blur – 3.00
Colour - #2c4848
Finally add your © copyright, licence and watermark
Then save as a GIF or JPG and you're done!
Then save as a GIF or JPG and you're done!
Thanks for trying my tutorial
::st!na::
© Tutorial written by Stina on 7th March 2009
All rights reserved
No comments:
Post a Comment