
Supplies
Scrap kit of choice - I am using "Wild Kitty" by Spinky Dinky Scraps which can be purchased from Cotton Candy Kreations
Tube of choice - I am using the artwork of Rion Vernon and PinUp Toons which can be purchased from CILM
**PLEASE DO NOT USE HIS ARTWORK WITHOUT THE APPROPRIATE LICENCE**
Vix_Mask173 (supplied)
Pattern: Animal Leopard Fur (supplied)
Fonts of choice - I am using 2Peas Important Notice and 2Peas Bad Attitude (pay fonts)
There is even a "Wild Kitty" alpha available for this kit which is a freebie and available at SpinkyDink Scraps
Plugin: Mura Meister Copies (supplied)
Plugin: Alien Skin Eye Candy 5 Textures / Animal Fur
My Supplies here
~ Step 1 ~
Open a blank canvas 600 x 600 flood-filled white
Paste Paper9 as new layer
Resize by 70%
Layers / New Mask Layer / From Image
Locate Vix_Mask173
Source luminance
OK
Resize by 70%
Layers / New Mask Layer / From Image
Locate Vix_Mask173
Source luminance
OK
In Layer Palette activate Mask layer
Resize by 105%
Layers / Merge / Merge Group
Layers / Merge / Merge Group
Paste Element13 as new layer
Resize by 80%
Resize by 80%
With your Magic Wand click inside the blank area
Selections / Modify / Expand by 3
Paste Paper1 as new layer
Resize by 60%
Selections / Invert
Delete and deselect
Layers / Arrange / Move Down
Selections / Modify / Expand by 3
Paste Paper1 as new layer
Resize by 60%
Selections / Invert
Delete and deselect
Layers / Arrange / Move Down
Add a drop shadow to the Frame element:
H & V – 1
Opacity – 50
Blur – 5.00
Colour - #000000
H & V – 1
Opacity – 50
Blur – 5.00
Colour - #000000
Duplicate Frame then resize by 55%
Use your magic wand to click inside the area
Selections / Modify / Expand by 3
Paste Paper16
Resize by 40%
Selections / Invert
Delete and deselect
Use your magic wand to click inside the area
Selections / Modify / Expand by 3
Paste Paper16
Resize by 40%
Selections / Invert
Delete and deselect
~ Step 2 ~
Paste Element10 as new layer
Resize by 60%
Position in upper right
Duplicate then Image / Rotate by 30 to the left
Layers / Arrange / Move Down
Position bows together then
Layers / Merge / Merge Down
Image / Rotate by 30 to the right
Adjust / Sharpness / Unsharpen Mask
Radius – 1.00
Strength – 100
Clipping – 4
Resize by 60%
Position in upper right
Duplicate then Image / Rotate by 30 to the left
Layers / Arrange / Move Down
Position bows together then
Layers / Merge / Merge Down
Image / Rotate by 30 to the right
Adjust / Sharpness / Unsharpen Mask
Radius – 1.00
Strength – 100
Clipping – 4
Add a drop shadow:
H & V – 1
Opacity – 50
Blur – 5.00
Colour - #000000
H & V – 1
Opacity – 50
Blur – 5.00
Colour - #000000
Paste Element25 as new layer
Resize by 50%
Resize by 50%
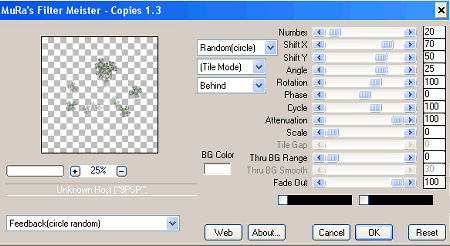
Effects / Plugins / Mura Meister / Copies with the following settings:
Paste Element24 as new layer
Image / Rotate by 30 to the left
Resize by 75%
Position to your liking
Image / Rotate by 30 to the left
Resize by 75%
Position to your liking
In your Material Properties select #ece7ec as your Foreground
Select your Change to Target brush with the following settings:
Select your Change to Target brush with the following settings:

Carefully brush over the pink part of the clip and it will change to a more blended colour
Paste Element40 as new layer
Image / Rotate by 15 to the right
Resize by 50%
Position over flower on clip of the element above
Image / Rotate by 15 to the right
Resize by 50%
Position over flower on clip of the element above
Paste Element40 (again) as new later
Resize by 60%
Position to the lower right
Duplicate and resize by 70%
Duplicate again and resize by 80%
Position both elements on the inner frame to your liking
Resize by 60%
Position to the lower right
Duplicate and resize by 70%
Duplicate again and resize by 80%
Position both elements on the inner frame to your liking
Open Element26
Image / Rotate by 90 to the right
Paste as new layer and position along the bottom of frame (see below)
Image / Rotate by 90 to the right
Paste as new layer and position along the bottom of frame (see below)
With your Freehand Tool draw around the excess element
Delete then deselect
Paste Element21 as new layer
Position along the bottom protruding slight from behind the Frame and tagback
Position along the bottom protruding slight from behind the Frame and tagback
Add a drop shadow to your layers:
H & V – 1
Opacity – 50
Blur – 5.00
Colour - #000000
H & V – 1
Opacity – 50
Blur – 5.00
Colour - #000000
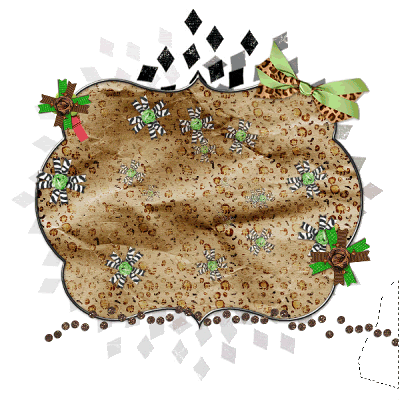
Crop and resize
~ Step 3 ~
Paste tube and resize as necessary
Add a drop shadow:
H & V – 1
Opacity – 50
Blur – 5.00
Colour - #000000
Add a drop shadow:
H & V – 1
Opacity – 50
Blur – 5.00
Colour - #000000
Select your Text Tool and font of choice (I am using 2Peas Important Notice)
In your Materials Palette:
Foreground – null
Background - #000000
In your Materials Palette:
Foreground – null
Background - #000000
Type out "Call of the Wild Kitty"
Objects / Align / Horizontal Centre in Canvas
Convert to raster layer
Objects / Align / Horizontal Centre in Canvas
Convert to raster layer
Select another font of choice (I used 2Peas Bad Attitude)
Set your Materials Palette to:
Foreground - #000000
Background – Animal Leopard (pattern)
(Angle – 0; Scale – 70)
Stroke width – 2.00
Size 72
Set your Materials Palette to:
Foreground - #000000
Background – Animal Leopard (pattern)
(Angle – 0; Scale – 70)
Stroke width – 2.00
Size 72
Type out your name
Objects / Align / Horizontal Centre in Canvas
Convert to raster layer
Add a drop shadow:
H & V – 1
Opacity – 50
Blur – 5.00
Colour - #000000
Objects / Align / Horizontal Centre in Canvas
Convert to raster layer
Add a drop shadow:
H & V – 1
Opacity – 50
Blur – 5.00
Colour - #000000
Add your © copyright, licence and your watermark
Unless you wish to animate, you can now save your tag as a GIF or JPG
To animate please go to the next step
To animate please go to the next step
~ Step 4 ~
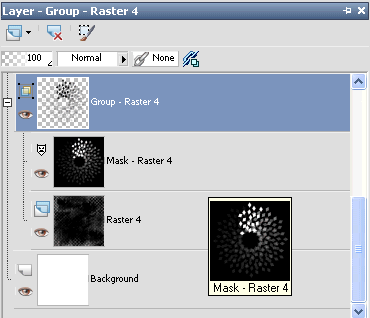
Activate Mask Layer (Group)
Duplicate three times to give you a total of FOUR layers
On original lower the opacity to 50
Rename the three duplicates Fur1, Fur2 and Fur3
Turn off the visibility for Fur2 and 3
Activate Fur1
Duplicate three times to give you a total of FOUR layers
On original lower the opacity to 50
Rename the three duplicates Fur1, Fur2 and Fur3
Turn off the visibility for Fur2 and 3
Activate Fur1
Effects / Plugins / Alien Skin Textures / Animal Fur with the following settings:
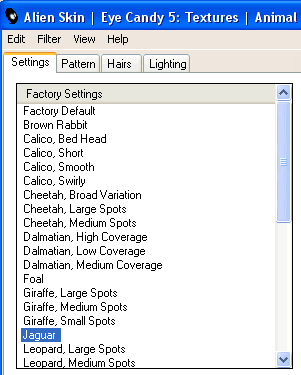
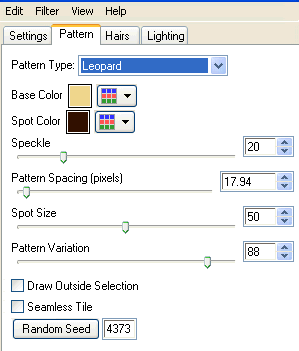
You only need to change the settings in the first two tabs – leave everything as is in the Hair and Lighting tabs
Turn off visibility of Fur1 and activate Fur2
Repeat application of Animal Fur, changing ONLY the Random Seed
Repeat application of Animal Fur, changing ONLY the Random Seed
Turn off visibility of Fur2 and activate Fur3
Repeat again, changing ONLY the Random Seed
Repeat again, changing ONLY the Random Seed
Now we're going to animate!
Again close off Fur2 and 3 with only Fur1 on
Edit / Copy Merged
Edit / Copy Merged
Open Animation Shop
Paste as new animation
Paste as new animation
Back in PSP
Close off Fur1 and activate Fur2
Edit / Copy Merged
Close off Fur1 and activate Fur2
Edit / Copy Merged
To Animation Shop
Edit / Paste after Current Frame
Edit / Paste after Current Frame
Back in PSP
Close off Fur2 and activate Fur3
Edit / Copy Merged
Close off Fur2 and activate Fur3
Edit / Copy Merged
To Animation Shop
Edit / Paste after Current Frame
Edit / Paste after Current Frame
Press CTRL + A to Select All
Then ALT + Enter to open Frame Properties
Change Properties to 20
Then ALT + Enter to open Frame Properties
Change Properties to 20
Now save as a GIF and you're done!
Thanks for trying my tutorial
::st!na::
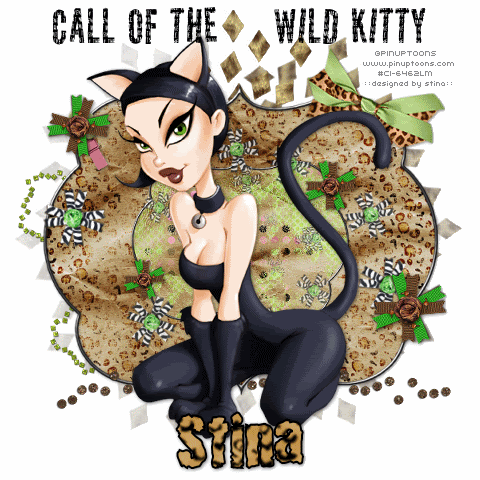
Here is a non-animated version:

© Tutorial written by Stina on 6th March 2009
All rights reserved
No comments:
Post a Comment