
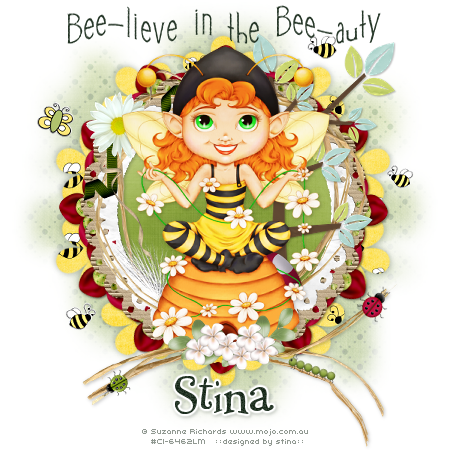
Supplies
Scrap kit of choice - I am using the deelightful "Don't Bug Me" kit by Oopsie Daisy which can be purchased exclusively at Exquisite Scraps
Tube of choice - I am using the lovely artwork of Suzanne Richards which can be purchased from CILM
**PLEASE DO NOT USE HER ARTWORK WITHOUT THE APPROPRIATE LICENCE**
Flowers from "Spring Fling" freebie kit by Sharon's Creations
Fonts of choice - I used 2Peas Chatter and 2Peas Flea Market
~ Step 1 ~
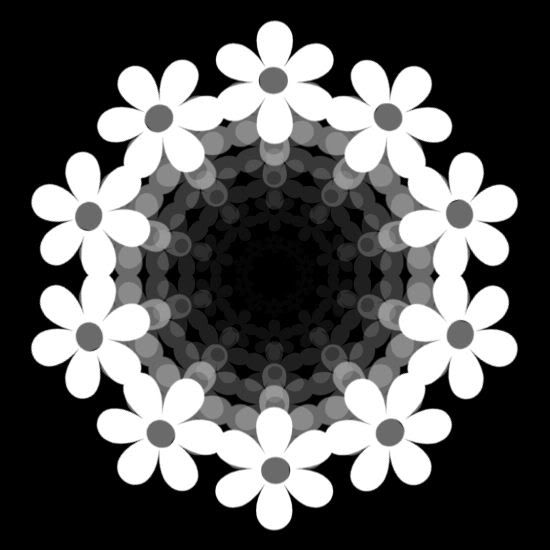
Place the Vix_Mask172 into your Masks folder
Open a new 600 x 600 blank canvas flood-filled white
Paste Frame2 as new layer
Resize by 12%
Image / Flip
Resize by 12%
Image / Flip
With your magic wand click inside the frame
Selections / Modify / Expand by 15
Paste PP-3 as new layer
Resize by 12%
Selections / Invert
Delete
Deselect
Rename this Frame-bkgd
Selections / Modify / Expand by 15
Paste PP-3 as new layer
Resize by 12%
Selections / Invert
Delete
Deselect
Rename this Frame-bkgd
Add a drop shadow to your Frame:
H & V - 1
Opacity - 25
Blur - 5.00
Colour - #000000
H & V - 1
Opacity - 25
Blur - 5.00
Colour - #000000
Activate your Background layer
Paste PP-7 as new layer
Resize by 14%
Paste PP-7 as new layer
Resize by 14%
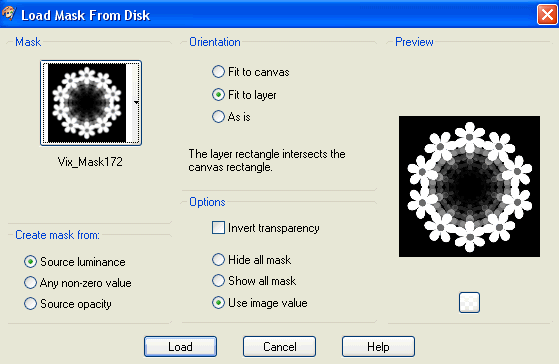
Layers / Load/Save Mask / Load Mask from Disk
Locate the Vix_Mask172 with the following settings:
Locate the Vix_Mask172 with the following settings:
Position mask layer behind Frame
Add a drop shadow:
H & V: 2
Opacity: 20
Blur: 8.00
Colour: #223324
H & V: 2
Opacity: 20
Blur: 8.00
Colour: #223324
Repeat Drop Shadow changing the Horizontal and Vertical drops to -2
In your Layer Palette turn off the visibility of your Frame and Frame-bkgd layers so you can see this next step
Paste Floral1 as new layer
Resize by 10%
Effects / Plugins / Mura Meister / Copies with the following settings:
Resize by 10%
Effects / Plugins / Mura Meister / Copies with the following settings:
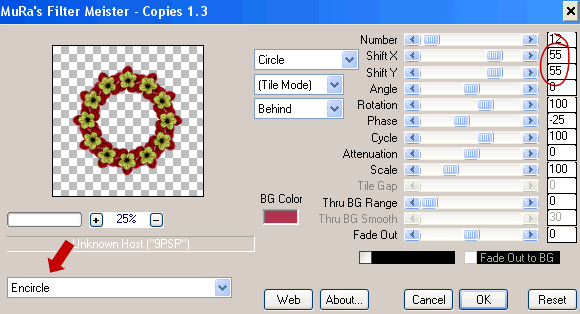
Turn on the visibility of your Frame and Frame-bkgd layers again
Position the Flowers behind the Frame so it encircles it
Add a drop shadow:
H & V - 1
Opacity - 50
Blur - 3.00
Colour - #000000
H & V - 1
Opacity - 50
Blur - 3.00
Colour - #000000
~ Step 2 ~
First let's add our tube
Paste tube and resize as necessary
Position in the centre of Frame
Paste tube and resize as necessary
Position in the centre of Frame
Paste Tree as new layer
Resize by 15%
Position behind your tube and slightly to the right
Resize by 15%
Position behind your tube and slightly to the right
Paste WishFlower as new layer
Image / Mirror
Resize by 10%
Image / Mirror
Resize by 10%
Grab your Eraser Tool and erase the stem from the flower
Image / Rotate by 10 to the right
Position along the inside edge of the Frame to the left of the tube
Image / Rotate by 10 to the right
Position along the inside edge of the Frame to the left of the tube
Paste FloralCorner as new layer
Resize by 10%
Place in the upper left to your liking
Resize by 10%
Place in the upper left to your liking
Paste BeeSticker as new layer
Resize by 5%
Place in upper right outside of Frame
Resize by 5%
Place in upper right outside of Frame
Duplicate then Image / Rotate by 20 to the right
Position slightly down
Resize by 85% Bicubic resample
Duplicate then Image / Mirror
Position to your liking
Position slightly down
Resize by 85% Bicubic resample
Duplicate then Image / Mirror
Position to your liking
Paste ButterflySticker as new later
Resize by 5%
Image / Mirror
Position to the left outside of Frame
Resize by 5%
Image / Mirror
Position to the left outside of Frame
Paste Ladybug4 as new layer
Resize by 5%
Image / Rotate by 40 to the right
Place on the end of the StrawRaffia ribbon of the Frame
Resize by 5%
Image / Rotate by 40 to the right
Place on the end of the StrawRaffia ribbon of the Frame
Paste Caterpillar as new layer
Resize by 5%
Image / Rotate by 20 to the right
Place on Raffia Ribbon
Resize by 5%
Image / Rotate by 20 to the right
Place on Raffia Ribbon
Paste SpringFling-Flower11 as new layer
Resize by 50%
Position along bottom of tube
Resize by 50%
Position along bottom of tube
With your Freehand Tool draw around the leaf overlapping one of the daisies

Crop and resize tag
~ Step 3 ~
Activate Background layer
Paste PP12 as new layer
Resize by 20%
Resize by 20%
Layers / Load/Save Mask / Load Mask from Disk
Locate WSL_Mask230
Fit to Canvas
Source luminance
Invert Transparency UNchecked
OK
Locate WSL_Mask230
Fit to Canvas
Source luminance
Invert Transparency UNchecked
OK
Layers / Merge / Merge Group
Lower the opacity of this layer to 40
Activate the top layer again
Select your Text Tool and a font of your choice - I am using 2 Peas Chatter
Select your Text Tool and a font of your choice - I am using 2 Peas Chatter
Foreground - null
Background - #223324
Background - #223324
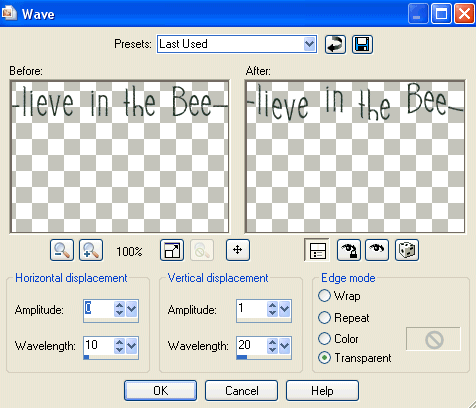
Type out "Bee-lieve in the Bee-auty"
Convery to raster layer
Convery to raster layer
Effects / Distortion Effections / Wave with the following settings:
Select another font for your name
Add a Gradient Glow (optional) and slight drop shadow
Add a Gradient Glow (optional) and slight drop shadow
Finally add your © copyright, licence and watermark, then save as a GIF or JPG and you're done!
Thanks for trying my tutorial!
::st!na::
© Tutorial writtem by Stina on 4th March 2009
All rights reserved
No comments:
Post a Comment